Home » Azure (Page 5)
Category Archives: Azure
 Add a runboook activity from a runbook
SharePoint Online as frontend for Azure Automation
Back in the Orchestrator days we had the Service Manager self-service portal that we could use to submit items that trigger runbooks in Orchestrator. The integration between Service Manager and Orchestrator worked great and the self-service portal brought a lot of value to automation scenarios. But time change and now we have a new executor in Azure Automation J
The challenge is that there is no connector between Azure Automation and Service Manager or any other portal. In this blogpost we will look at how we can use SharePoint Online as a frontend to Azure Automation. The process of a new request will be:
- User submits a new item in a SharePoint list
- A SharePoint workflow trigger a Azure Automation runbook
- Azure Automation does magic
- Azure Automation update the list item in SharePoint
- The user sees the result in the SharePoint list
Setting up SharePoint
- Sign-in to SharePoint online
- Add a custom list, click on the Add list tile

- Download and install SharePoint Designer on your workstation
- Once you have installed SharePoint Designer, click on Edit List in the List toolbox, SharePoint Designer will start and load your SharePoint site

- In SharePoint Designer click Edit List columns
- In the Edit List view, use the Add New Column and Column Settings to configure the list as you need it to be. In my example I have a list with a number of fields that are needed to create a new service account in Active Directory. I have also added a column named Result that Azure Automation use to write back the result from the runbook. There is also a column named Azure Automation Status that is used to report back the response when submitting the job to Azure automation. The SP Workflow and the column will be automatic created when we connect a workflow to the list.
- When the list is as you like it, click SAVE and go back to SharePoint and refresh the page
The list is now created. You can click New Item in the list view and submit new items. You can click Edit this view and add the ID column. The runbook will use the ID field to keep track of which list item to work with.
Setting up Azure Automation
Next step is to setup the Azure Automation runbook and configure the webhook. More general information about webhooks can be found here.
- First thing we need to do is configure Azure Automation with a SharePoint Online module. Tao Yang have a good blog post about this. Tao blogpost is about import the module in SMA, but that you should not try to do J instead only follow Tao steps to build the ZIP file. You can download his ZIP file and then you add the two DLL files that he also link too.
- Once you have the complete ZIP file, browse to your automation account in Azure Automation and click on Assets and then Modules
- On the Modules page, click Add a module, and upload the ZIP file. Remember that if you are planning to use a Hybrid worker the module must be installed on all hybrid workers too

- After the module is imported you need to setup a connection to your SharePoint site, for example. Remember that the service account used cannot be configured with two factor authentication, the account also has to have permissions on the SharePoint site.

- I have put together an example runbook for this scenario, which can be found here. It will first show/output you all data that comes from the webhook. It will then connect to SharePoint and get the current list and list item. In the end of the runbook an account is created and a hash table is created to update back into SharePoint. Either use my example runbook or build a new runbook.
- Next step, after the runbook is in place, is to create a webhook, click on the runbook, click webhook and add a new webhook. Remember to copy the webhook URL before clicking Create
Configure the SharePoint workflow
It is now time to configure the SharePoint workflow that will trigger the runbook when a new list item is created.
- Open SharePoint Designer and load your SharePoint site
- In SharePoint Designer, click Lists and Libraries on the left side, then click on your list
- On the right side on SharePoint Designer, click New… next to Workflows
- Name the new workflow, for example Workflow 0003 in my example. Use SharePoint 2013 Workflow as platform type
- When the workflow is created, configure it to start automatically when a new item in the list is created

- Click Edit Workflow to start build the new workflow
- The runbook, when complete, should look like this

- The first step is to build a Directory, map list fields with variables

-
Next step is call the runbook webhook, paste the webhook URL. Remember to change to HTTP POST

- The last step in the workflow post the response from Azure Automation back to a column in a list. When the workflow do the HTTP POST to trigger the runbook a message is sent back, that is the message that you will write back to a column. This will be a simple log if the job has been submitted to Azure Automation successfully

- When all steps in the workflow are configured, click SAVE and then PUBLISH in SharePoint Designer.
Testing 1-2-3
We have now built a list in SharePoint, we have built a workflow in SharePoint that will invoke a runbook. The runbook performs some action, in this example it creates an AD account, and sends the results back to the list in SharePoint.
We fill in the list item. I guess that with a bit more SharePoint skills it would be possible to hide the two last test fields when filling in the information. Those two fields are only used to store status.

After a couple of seconds we can see that the workflow has run (Stage1) and that there is a response from Azure Automation when triggering the webhook (Accepted)

In Azure Automation we can see that the jobs has completed. We can see a lot of info as Output from the runbook. In a production runbook you might want to scale down all the extra code and output J

If we go back to SharePoint and do a refresh we can see there is a result saying the account already exists in AD and no new account has been created. If we submit a new item with request for another account is works, the new account is created J


If you would like to add approval steps to your solution, read more here.
OMS black belt Jakob also have great ideas about using SharePoint Online that I recommend, read it here
Moving a VHD between storage accounts
Moving a virtual machine (VM) between storage accounts sounds like an easy task, but can still be a bit complicated J In this blog post I will show how this can be done with AzCopy. AzCopy is a command-line utility designed for high-performance uploading, downloading, and copying data to and from Microsoft Azure Blob, File, and Table storage. Read more about AzCopy and download it here. When using AzCopy you need to know the key for your storage account. This key can be found in the Azure portal, both the preview portal and the classic portal.


When you are copying a VHD file for a VM you need to know the storage account URL and name of the VHD file. This can be found
- Classic Portal. Click Virtual Machines, click Disks and look at the Location column. The first part of the Location URL is the name of the storage account.
- Preview Portal. Click at a virtual machine, click All settings, click Disks, click on the disk and look at VHD location. The first part of the Location URL is the name of the storage account.
- If your target is a storage account in the v2, the preview portal, and you need to know the URL to the storage account, click the storage account, click All Settings, Access Keys and then look at the Connection String. In the connection string you will find BlobEndPoint, this is the URL to use as destination.
In this scenario I will move a VHD located at https://psws5770083082067456747.blob.core.windows.net/vhds/geekcloud-geekcloud-dc01-2013-11-22.vhd to a new storage account in v2, https://contosowelr001.blob.core.windows.net/
- Start a Command Prompt
- Go to the C:\Program Files (x86)\Microsoft SDKs\Azure\AzCopy folder
- Run the following command to start the copy job. In the image I have covered the two keys, but I think you still get the command JAzCopy.exe /source:<The https:// URL to your storage account and container> /Dest:<The https:// URL to your destination storage account and container> /sourcekey:<The primary key for the source storage account> /destkey:<The primary key for the target storage account> /pattern:<file name>
- Wait…
- When the copy job is completed verify it was successfully


If you want to get the files you have in an Azure storage account, you can use PowerShell. In this example we first setup storage account context and then list files for each container in the storage account.
$blob_account = New-AzureStorageContext -StorageAccountName contosowelr001 -StorageAccountKey xl6DMUmnbKvr -Protocol https
Get-AzureStorageContainer -Context $blob_account | ForEach-Object {
$container = $_.Name
get-azurestorageblob -Container $container -Context $blob_account | Select Name
}
You can also see the files in the Azure portal, under the storage account/blobs/containers/

â€Run As†with Azure Automation Hybrid Worker
Runbooks in Azure Automation cannot access resources in your local data center since they run in the Azure cloud. The Hybrid Runbook Worker feature of Azure Automation allows you to run runbooks on machines located in your data center in order to manage local resources. The runbooks are stored and managed in Azure Automation and then delivered to one or more on-premise machines where they are run. Source.
By default the runbook will run in the context of local system account on the Hybrid Runbook Worker. This might be a challenges, as the computer account is seldom assigned any permissions, even if possible. The scenario I was working included creation of a service account in an on-premises domain. My first idea was to change the service account for the Microsoft Monitoring Agent service. But that did not work out very well L

Next idea was to in my Azure Automation runbook do a remote session to a server with domain account as credentials. The runbook shown in this blogpost is an example of how to do a remote session within an Azure Automation runbook. The runbook use two input parameters, first name and last name. The runbook picks up the account (SKYNET Super User) that will be used to remote connect to a domain controller. The account is stored encrypted in Azure Automation as an asset. The inline script session returns the name of the new user account, which is also returned as an output (Write-output) from the runbook.

I start the runbook from the Azure Portal, input the two parameters. A short while later I can see the job is completed and the output from the runbook. I can also see the new account in Active Directory.


Note that this is provided “AS-IS” with no warranties at all. This is not a production ready management pack or solution for your production environment, just an idea and an example.
Network Security Groups – Getting a overview
I was working with Network Security Groups (NSG) earlier this week. The environment included multiple VNET, subnets, NSG and association on both VMs and Subnets. It quick became complicated to keep track of what has been configured, associations and NSG rules. Therefor I created a PowerShell script that generates a HTML based report that gives me an overview. I thought I should share this with the community, even if it is a “quick-hack-with-bad-written-code” J
To run the script, start Azure PowerShell and set up a connection to your Azure subscription. Also make sure you have a C:\TEMP folder. The script will export your Azure network configuration and read it. The script will also query your Azure subscription for information for example virtual machines with NSG associated. The HTML file will be named C:\temp\net.htm.
First part of the HTML page is an overview of VNET, subnets, Address prefix and associated NSG. The second part of the HTML page is an overview of NSG rules in use. In this example I have three NSG in use, two associated with subnets and one associated with two virtual machines. There is also one NSG that is not in use at all.
Download the script List NSGv2.


Note that this is provided “AS-IS” with no warranties at all. This is not a production ready management pack or solution for your production environment, just an idea and an example.
Building your first Azure Resource Group template for IaaS
At the BUILD conference last week Microsoft announced the public preview for template-based deployments of Compute, Networking and Storage, using the Azure Resource Manager. With this new template feature we can build complex models of services and deploy in an easy way. If you have been building large PowerShell scripts before for deployment you should take a look at this, as it is easier to work with. In this blog post I want to show you how to get started building a resource manager template for a new virtual machine.
To build the template I am using Visual Studio. If you are an IT pro like me everything with Visual Studio is often a bit scary, but in this case it is really easy J On top of Visual Studio you need to install latest version of Azure SDK and latest Visual Studio updates. I installed both the Azure SDK and Visual Studio with default settings.
- Start Visual Studio and select to create a new project
- Select to create a Azure Resource Group project
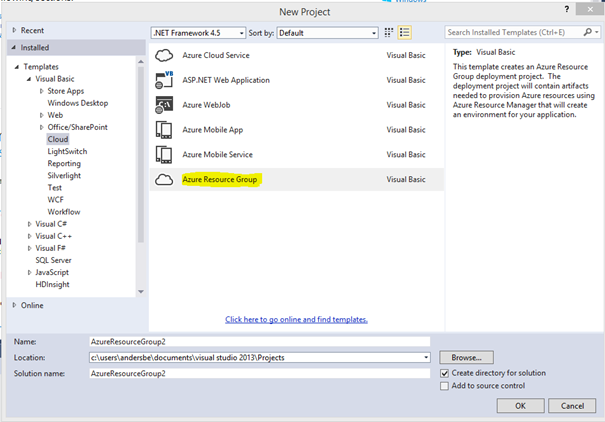
- Name the new project, for example Contoso Single Server Template, click OK
- On the Select Azure Template page, select Windows Virtual Machine and click OK. This template will deploy a Windows VM with a couple of different options. It is a good foundation to then add on more to.

- Visual Studio have now generated a three files for you, and this is all you need to start. You now have a working template that you can start using direct. There is a configuration file (WindowsVirtualMachine.json) that includes all the settings and details of what you want to deploy to Azure Resource Manager, and there is a parameter file (WindowsVirtualMachine.param.dev.json) that includes all user defined values that he configuration file needs. There is also a PowerShell script (Deploy-AzureResourceGroup.ps1) that is used by Visual Studio to deploy you template. You can also see AzCopy.exe in the Tools folder. AzCopy is used by PowerShell to copy files to a storage account container, if you template includes files and custom code to deploy.

-
You can now test the template by right-click on Contoso Single Server Template and select Deploy, New Deployment. Connect to your Azure subscription and configure all parameters. Then click Deploy.

-
You can now see that the deployment has started in the Output window in Visual Studio. You can also log on the Azure Preview portal and follow the deployment in your new resource group. Once the deployment is done, you can see the result in the Output window in Visual Studio.


We have now deployed one instance of the new resource group template, including a virtual machine. Let’s say we want to add one more virtual machine to the template.
- In Visual Studio, Solution Explorer, select WindowsVirtualMachine.json and then click on the JSON Outline tab

- To add a virtual machine, right-click resources and select Add Resource
- In the Add Resource wizard, select Windows Virtual Machine. Input VM02 as Name and select the already existing storage account and virtual network. Click Add

- If you look in the JSON Outline window, at parameters, you can see that Visual Studio just added a number of parameters for VM02

- To update the already existing deployment with the new virtual machine, right-click Contoso Single Server Template and select Deploy
- Fill in the parameters for VM02 and then click Deploy
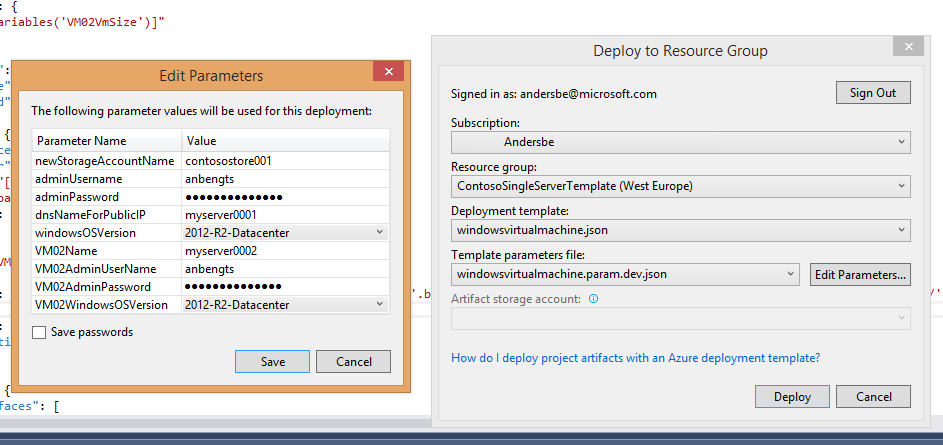
- You can watch the deployment of the second VM both from Visual Studio and the Azure Preview Portal.
We have now built a template that deploys two virtual machines. As you notice when we did the second deployment we needed to input VM admin user name and password twice. Let look at how we can use the same parameter for both virtual machines
- In Visual Studio, in Solution Explorer, click the WindowsVirtualMachine.json file
- In JSON Outline tab, click VM02, and you will see the code for VM02 is highlighted, scroll to osProfile

- As we want to use the same parameter for admin credentials on VM02 as on the first VM replace the VM02 parameters with the parameter we use for the first VM

- Delete VM02AdminUserName and VM02AdminPassword parameters in the JSON Outline tab
- In Visual Studio, in Solution Explorer, click the WindowsVirtualMachine.param.dev.json file
- In the param.dev.json file, remove the VM02AdminUserName parameter
- Now, do a new deployment and verify you can connect to both new virtual machines with the admin credentials
When you are done with your template you can right-click Contoso Single Server Template and choose Build (same place as Deploy). This will build your solution and you can now copy it from the project folder, default folder C:\Users\<username>\Documents\Visual Studio 2013\Projects\Contoso Single Server Template\Contoso Single Server Template. In the Scripts folder you will find the PowerShell script that you can use to deploy the template. In the Templates folder is the two JSON files. To deploy an instance of the template you can run the PowerShell script from Azure PowerShell.
Another way to deploy with the template is to paste the template code into Template Deployment in the Azure Portal. The third way to deploy using the template is to upload it to a storage account and then trigger it direct into the Template Deployment feature. A tricky part with that is that you have to replace escape all the special characters, for example
https://contoso11.blob.core.windows.net/scripts/WindowsVirtualMachine.json
Becomes

In this blogpost we have discussed how we can use Visual Studio to build resource group templates for IaaS resources. We can then deploy resources with the template from both the Azure Portal and from Azure PowerShell.
VM snapshot with Azure Backup
System management including backup is an important area to look into when starting to plan for Azure. System Center can be used to manage Azure resources or in some scenarios we can do it with Azure services. Backup is an interesting topic to discuss when starting to deploy virtual machines in Azure. There are a couple of reasons to use Azure Backup, instead of backup Azure virtual machines with a backup solution on premise
- Outgoing data (data leaving the Azure datacenter) cost, backup can cause a lot of outgoing data
- There might not be bandwidth enough to finish the backup within the backup window
- It might take too long time to upload the data during a restore operation
- Buying backup as a service is usually easier to administrate and cheaper to own than an on-premises solution
Azure Backup is a solution for protecting data on premise and in the cloud. Azure Backup is a scalable solution with zero capital investment and minimal operational expense. Either you can run Azure Backup with System Center Data Protection Manager (DPM) or deploy agents direct from Azure Backup. More info about Azure Backup here. In this blog post we will look at how Azure Backup can be used to do snapshot backup of virtual machines in Azure.

Figur 1 Azure Backup Dashboard
The first thing you need to do is to create a backup vault in the Azure portal. You can create multiple backup vaults, for example if you have virtual machines in different regions in the world. Once you have created a backup vault it is time to discover Azure virtual machines. The discover process gets a list of all virtual machines in the same region that are not already protected by Azure Backup. After you have registered virtual machines you can select to register them. During registration the backup extension is installed into the selected virtual machines. The virtual machine must be online for the registration to work.
Next step is to protect the virtual machine. Selected a registered virtual machine that is not already protected, and click protect. To configure protection we use policies. We can either add the virtual machine to an existing policy or create a new policy. The policy will control backup frequency and retention range. You can create multiple backup policies in your vault, but a virtual machine can only be member of one backup policy.

Figur 2 Select machine to protect

Figur 3 Configure backup policy
If needed you can edit the backup policy, on the policies page.

Figur 4 Edit existing backup policy
Â
The backup policy will protect the virtual machine. If we for any reason need to do a backup directly we can select it on the protected items tab and click backup now.

Figur 5 Overview of protected items
Â
The first backup is a full backup and future backups will only backup changes (incremental) from the previous backup. In the next figure show that the first backup took at bit extra time

Figur 6 Backup jobs
On the protected items page (figure 5) we can also select a virtual machine and click restore. We can restore the virtual machine as either another virtual machine (restore with new virtual machine name) in the original cloud service or with the original virtual machine name in another cloud service. If we try to restore the virtual machine and overwrite the original virtual machine the restore job will fail and this error will be in the logs

Figur 7 Trying to overwrite existing VM
The virtual machine snapshot feature do full snapshots of all disks without the temporary disk. If you need to backup more granular you can also deploy an Azure Backup agent to the guest OS.
Summary: With Azure Backup we can make snap shot backups of complete virtual machines running in Azure. We can restore the backup as original virtual machine or to an alternative virtual machine.
Â
Note that this is provided “AS-IS” with no warranties at all. This is not a production ready management pack or solution for your production environment, just an idea and an example.
Deploy new VM and attach a template data disk
I was working on a scenario were we needed to deploy new VMs and attach a data disk that included a number of tools. This Azure Powershell script will deploy a new VM, make a copy of a template data disk with all the tools, and attach the disk to the new VM.
Before you run the script you need to update at least network settings, source storage Account and target storage account. You might also update VMsize, CloudService and VMName. The current script will create a new VM with a named based on the current date and time. Information about Your storage accounts can be found in the Azure management portal, under each storage Account.
## Parameters
### Admin account settings
$login = “AdminUser”
$Password = “YourSecretPassword!!”
### Vm name and cloud service settings
$TimeStamp = Get-Date -Format ddHHmmss
$NewVMName = “TEST-” + $TimeStamp
$CloudServiceName = Get-AzureService -ServiceName myCloudService
$InstanceSize = “Small”
### Network Settings
$SubnetName = “Subnet-1”
$VNetName = “vnet01”
### Source Storage Account and tool disk source URL
$srcStorageAccount = “contosostorage201501”
$srcStorageKey = “FJHmK//VbvHeeEgRqukL1015XjP2mU+DQvy65TmCR9TMw==”
$srcUri = “https://contoso0001.blob.core.windows.net/vhds/myToolsDisk.vhd”
### Target Storage Account and blob container settings
$destStorageAccount = “contoso0002”
$destStorageKey = “f94MIsNiwrv4qJBqEOfbVUQeSNkvT4QA==”
$containerName = “vhds”
##################################################################
##################################################################
### NO NEED TO CHANGE BELOW THIS LINE ###########################
##################################################################
##################################################################
##
## Deploy new Windows Server 2012 R2 Datacenter Edition
##
$image = Get-AzureVMImage | where {$_.Label -like “Windows Server 2012 R2 Datacenter*”} | select -First 1
$vmconfig = New-AzureVMConfig -ImageName $image.ImageName -InstanceSize $InstanceSize -name $NewVMName
Add-AzureProvisioningConfig -Windows -AdminUsername $login -Password $Password -vm $vmconfig
Set-AzureSubnet -SubnetNames $SubnetName -vm $vmconfig
New-AzureVM -servicename $CloudServiceName.ServiceName -vms $vmconfig -VNetName $VNetName -WaitForBoot
##
## Stop the VM
##
Stop-AzureVM -Name $NewVMName -ServiceName $CloudServiceName.Label
###
### Create the source storage account context
###
$srcContext = New-AzureStorageContext –StorageAccountName $srcStorageAccount -StorageAccountKey $srcStorageKey
###
### Create the destination storage account context
###
$destContext = New-AzureStorageContext –StorageAccountName $destStorageAccount -StorageAccountKey $destStorageKey
###
### Create the container on the destination, if not already existing
###
$containers = Get-AzureStorageContainer -Context $destContext -Name vhds
if($containers.count -eq 0){
New-AzureStorageContainer -Name $containerName -Context $destContext
Write-host “Container created”
} else {
Write-host “Container already exists”
}
###
## Configure new VHD file name
###
$DestVHD = $NewVMName + “-tools-disk.vhd”
$DestVHDURL = $destContext.BlobEndPoint + $containerName + “/” + $DestVHD
###
### Start the asynchronous copy
###
$blob1 = Start-AzureStorageBlobCopy -srcUri $srcUri -SrcContext $srcContext -DestContainer $containerName -DestBlob $DestVHD -DestContext $destContext
##
## Register VHD as a Data Disk
##
Add-AzureDisk -DiskName $destVHD -MediaLocation $DestVHDURL -Label $destVHD
##
## Add the disk
##
Get-AzureVM -ServiceName $CloudServiceName.Label -Name $NewVMName | Add-AzureDataDisk -Import -DiskName $DestVHD -LUN 0 | Update-AzureVM
##
## Start the VM again
##
Start-AzureVM -Name $NewVMName -ServiceName $CloudServiceName.Label
Write-host “##################”
Write-host “### FINISHED!! ###”
Write-host “##################”
Add network card to Azure VM
This is a script I wrote when Pete and I were preparing our System Center Universe session a couple of Days ago. The scenario is that you have a VM running in Azure with one network card. Now you want to add another network card. It is only possible to add a network card when creating the VM. This script will delete the current VM, keep the disk, create a new VM with two network card and attach the disk again.
Things to add to this script can be how to handle VM size. Depending on the VM size you can have different number of network cards, for example if you have 8 CPU cores you can have 4 network cards. It would be good if the script could handle that. It would also be good if the script could handle multiple disk on the original VM. That might show up in vNext 🙂
$VMName = “SCU001”
$ServiceName = “SCU001”
$InstanceSize = “ExtraLarge”
$PrimarySubNet = “Subnet-1”
$SecondarySubnet = “Subnet-2”
$VNET = “vnet001”#Get the current disk
$disk = Get-AzureDisk | where {$_.AttachedTo -like “*RoleName: $VMName*”}### Shutdown the VM
Get-AzureVM -Name $VMName -ServiceName $ServiceName | Stop-AzureVM -Force# Remove the VM but keep the disk
Remove-AzureVM -Name $VMName -ServiceName $ServiceName# Deploy a new VM with the old disk
$vmconf = New-AzureVMConfig -Name $VMName -InstanceSize $InstanceSize -DiskName $disk.DiskName |
Set-AzureSubnet -SubnetNames $PrimarySubNet |
Add-AzureNetworkInterfaceConfig -name “Ethernet2” -SubnetName $SecondarySubnet |
Add-AzureEndpoint -Protocol tcp -LocalPort 3389 -PublicPort 3389 -Name “Remote Desktop”New-AzureVM -ServiceName $ServiceName -VNetName $vnet -VMs $vmconf
List all containers in all storage accounts
This script list all containers in all storage accounts, in your Azure subscription. It is handy when looking for a container or a blob end point.
 $accounts = Get-AzureStorageAccount

Foreach ($account in $accounts)

{

$sa = Get-AzureStorageAccount -StorageAccountName $account.storageAccountName

$saKey = Get-AzureStorageKey -StorageAccountName $sa.StorageAccountName

$ctx = New-AzureStorageContext -StorageAccountName $sa.StorageAccountName -StorageAccountKey $saKey.Primary

Get-AzureStorageContainer -Context $ctx

}Â

Service Manager in the cloud with Azure RemoteApp power
Last week I tried Microsoft Azure RemoteApp together with System Center Service Manager. Azure RemoteApp is a service that you can use to support your organization to stay productive anywhere and on almost any device. Your applications runs on servers in Azure or locally, clients install a Microsoft Remote Desktop client and can then access the applications same way as if they were running locally. The great value is that you don’t need to administrate a service to publish applications to clients, you buy that component as a service. The application that you publish can run in Azure or it can run locally, or a combination.
When you deploy RemoteApp you can set it up in either Cloud only mode or Hybrid mode. Hybrid mode comes with VPN to local datacenter and all users must be users from your local Active Directory. It also have an option to join the custom template to a domain.
When running in Cloud only mode everything is running in Azure and your users can be a Microsoft account. There is no option to join your custom template machine to a domain.
In this blog post I want to show a couple of screens and share some experience from when I configured RemoteApp in Hybrid mode together with Service Manager.
I wanted to run the Service Manager console in RemoteApp, therefor I needed to build a custom template. There is a default Windows Server template (think with Office) that you can use if you just want to test RemoteApp a bit. But in this scenario I installed a local virtual machine and installed the Service Manager console on it. Then I ran Sysprep. All steps you need to go through to build a customer template are documented here.

Once the image was uploaded I created a RemoteApp service, as I want to access resources in my local datacenter I selected “Create with VPN”. When deploying the RemoteApp template you can’t select which virtual network it should be deployed in. Instead it will create a new virtual network. If you want to connect your RemoteApp host machine to an existing virtual network in Azure you can build a VNET-2-NET connection, see this blog post. If you have for example have a domain controller or application server running in a VNET today, in Azure, and you want your RemoteApp template to connect to those servers you will need to configure a VNET-2VNET connection as the blog post describes.

Once RemoteApp is deployed you can upload the customer template image. You can upload it with a script that you will find in the Azure management portal. In the portal under RemoteApp/Template Image you can click Upload. A wizard will start and give you a script that should be used to upload the VHD file.

In the RemoteApp service, in the Azure management portal, you get a “wizard” to step through to configure everything. First part is about connecting local network with the new RemoteApp network in Azure. Second part is about linking a RemoteApp template image. Third is about configure programs to publish and configure user access. In the need is the URL for the client software.
You can connect an existing virtual network or create a new network. “Get Script” will give you a script you can run on your locally edge device to configure a VPN. “Get Key” will show the VPN IP to use to connect to the RemoteApp network and it will also show the pre-shared key for the VPN.
“Link a RemoteApp template image” let you pick the remote app you uploaded earlier.

Options to join the local domain

Options to publish applications either by a path or by start menu. I installed the Service Manager console on the template image machine before running Sysprep. I can now select the Service Manager console from the start menu programs option, as it was in the start menu on the template machine.

Programs published to my users


Users can now start the Microsoft RemoteApp client and start a published application

The Service Manager console running in Azure RemoteApp connected to a Service Manager server running in a VNET in Azure. I looks very much as it is running locally J

Summary. We use Azure RemoteApp to publish consoles to applications that are running either in Azure only or in both Azure and locally. Azure RemoteApp works on many different types of devices. The service is easy to get started with, especially if compared running to Remote Application infrastructure locally.
Recent Comments