Home » System Center Service Manager
Category Archives: System Center Service Manager
 Dependencies between runbooks in Orchestrator
Service Manager in the cloud with Azure RemoteApp power
Last week I tried Microsoft Azure RemoteApp together with System Center Service Manager. Azure RemoteApp is a service that you can use to support your organization to stay productive anywhere and on almost any device. Your applications runs on servers in Azure or locally, clients install a Microsoft Remote Desktop client and can then access the applications same way as if they were running locally. The great value is that you don’t need to administrate a service to publish applications to clients, you buy that component as a service. The application that you publish can run in Azure or it can run locally, or a combination.
When you deploy RemoteApp you can set it up in either Cloud only mode or Hybrid mode. Hybrid mode comes with VPN to local datacenter and all users must be users from your local Active Directory. It also have an option to join the custom template to a domain.
When running in Cloud only mode everything is running in Azure and your users can be a Microsoft account. There is no option to join your custom template machine to a domain.
In this blog post I want to show a couple of screens and share some experience from when I configured RemoteApp in Hybrid mode together with Service Manager.
I wanted to run the Service Manager console in RemoteApp, therefor I needed to build a custom template. There is a default Windows Server template (think with Office) that you can use if you just want to test RemoteApp a bit. But in this scenario I installed a local virtual machine and installed the Service Manager console on it. Then I ran Sysprep. All steps you need to go through to build a customer template are documented here.

Once the image was uploaded I created a RemoteApp service, as I want to access resources in my local datacenter I selected “Create with VPN”. When deploying the RemoteApp template you can’t select which virtual network it should be deployed in. Instead it will create a new virtual network. If you want to connect your RemoteApp host machine to an existing virtual network in Azure you can build a VNET-2-NET connection, see this blog post. If you have for example have a domain controller or application server running in a VNET today, in Azure, and you want your RemoteApp template to connect to those servers you will need to configure a VNET-2VNET connection as the blog post describes.

Once RemoteApp is deployed you can upload the customer template image. You can upload it with a script that you will find in the Azure management portal. In the portal under RemoteApp/Template Image you can click Upload. A wizard will start and give you a script that should be used to upload the VHD file.

In the RemoteApp service, in the Azure management portal, you get a “wizard” to step through to configure everything. First part is about connecting local network with the new RemoteApp network in Azure. Second part is about linking a RemoteApp template image. Third is about configure programs to publish and configure user access. In the need is the URL for the client software.
You can connect an existing virtual network or create a new network. “Get Script” will give you a script you can run on your locally edge device to configure a VPN. “Get Key” will show the VPN IP to use to connect to the RemoteApp network and it will also show the pre-shared key for the VPN.
“Link a RemoteApp template image” let you pick the remote app you uploaded earlier.

Options to join the local domain

Options to publish applications either by a path or by start menu. I installed the Service Manager console on the template image machine before running Sysprep. I can now select the Service Manager console from the start menu programs option, as it was in the start menu on the template machine.

Programs published to my users


Users can now start the Microsoft RemoteApp client and start a published application

The Service Manager console running in Azure RemoteApp connected to a Service Manager server running in a VNET in Azure. I looks very much as it is running locally J

Summary. We use Azure RemoteApp to publish consoles to applications that are running either in Azure only or in both Azure and locally. Azure RemoteApp works on many different types of devices. The service is easy to get started with, especially if compared running to Remote Application infrastructure locally.
Add a runboook activity from a runbook
Earlier this week I needed to add a runbook activity to a Service Request depending on the result from a review activity. I have written about adding activities to a service request from a runbook before, here. The difference is that this time I needed to add a runbook activity and that is a bit more complicated than adding for example a review activity or manual activity.
To add a runbook activity you need two activities, first one that gets the runbook (System Center Orchestrator Runbook Item) you want to use, the second activity creates a new related runbook activity (Runbook Automation Activity) to the service request. In this example I will add a Runbook Automation Activity that runs a runbook named “12.4 Build new VM”.


For the Create Related RB activity there are more to configure compared with the “Get RB Item” activity.
- Source Object Guid. This is the SC Object GUID from a Get Object activity that gets the Service Request that we want to add a Runbook Automation Activity to.
- Sequence ID. This field configure where, compared with already existing activities in the Service Request, this new activity will be added. The first activity in a Service Request has sequence ID 0, the second 1 and so on. In my service request I have one review activity and then a runbook activity. This new runbook activity will be added after both of them, sequence ID 2 in other words.
- ID. This is the id of the new runbook activity. {0} will give it next free serial number from Service Manager, “RB” is added to make sure it is named not just a number but also RB in front of the number.
- Is Ready For Automation is set to TRUE. This will allow the Runbook Activity to be triggered when the Service Request is created and the Runbook Activity becomes In Progress.
- Title. Title of the runbook Runbook Automation Activity, for example “Build new VM”
- Runbook Identifier. This is the ID of the runbook you want to run, you get the ID from the previous Get RB Item activity.
- Template Identifier. This is a bit more complicated to find, this is the Name of the template you have built for the Runbook Automation Activity in Service Manager. If you start Service Manager Shell (Service Manager PowerShell) you can run “Get-SCSMObjectTemplate | ft Name, DisplayName” and you will find the value you need. Most likely your template name starts with Template.
- Status. Status of the new activity, configure it to Pending
-
Property Mapping. This is parameters that we pass to the new Runbook Automation Activity.
- <NAME> is the name of the input parameter in the runbook, the parameter set in in the Initialize Data activity
- <ID> is the ID of the parameter in Orchestrator. Each parameter has a unique ID. You can list get the connection between parameter, activity and runbook with the following SQL query. In my example query I ask for all input parameters named “SR”.
SELECT OBJECTS.Name AS [Activity Name], POLICIES.Name AS [Runbook Name], CUSTOM_START_PARAMETERS.UniqueID AS [Parameter ID], CUSTOM_START_PARAMETERS.Value AS [Parameter Name] FROM CUSTOM_START_PARAMETERS INNER JOIN OBJECTS ON CUSTOM_START_PARAMETERS.ParentID = OBJECTS.UniqueID INNER JOIN POLICIES ON OBJECTS.ParentID = POLICIES.UniqueID WHERE (CUSTOM_START_PARAMETERS.Value = ‘SR’)
- <VALUE> the value I pass to the new runbook is the Runbook Automation Activity ID. Based on that ID you can find the for example related service request
- <RunbookID> is the ID of the Runbook Item. You can get it from the Get Runbook activity or you can use Service Manager Shell to get it. To get it with Service Manager Shell run “Get-scsmclass –name Microsoft.SystemCenter.Orchestrator.RunbookItem | get-scsmclassinstance | where-object {$_.Name –like “*12.4*”} | ft Name, Id
In this example I ask for a runbook activity that I know is named something with 12.4.

Â

Those two activities is the two activities you need to add a Runbook Automation Activity. I notice that it works better if you also mark the current runbook as completed, from the runbook itself instead of from Service Manager. When adding activities in general I have notice that mark the current runbook as completed makes the service request process work better.
In the runbook you invoke you will get the Runbook Automation Activity SC GUID as input parameter. From there you can use a Get Relationship activity to find the related Service Request.

Â
Once you have the Service Request you can read for example all use input data, in my example settings for a new virtual machine. User Input, everything the user has input in for example the self-service portal when submitting the service request, is stored in XML format. For example

To get only “Stockholm” you can use a Query XML activity

Â

Â
Summary: In this blog post we have looked at how we can use a Runbook Automation Activity in a Service Request to add another Runbook Automation Activity. We have also looked at how to pass data to the new runbook. This scenario is useful if you for example want to add activities based on the answer from a review activity.
How-to handle monitoring activities in SMA
In Orchestrator we often use a monitoring activity in the beginning of a runbook, for example monitor Service Manager for new incidents. In SMA we do this a bit different which I will explain in this blog post. Remember that you can connect Orchestrator and SMA together as shown in this blog post http://contoso.se/blog/?p=3857 , and get the best of both of them.
In general we need to write a runbook (Powershell workflow script) that runs every X minute and checks “a source” and then performs some “action”, as shown in figure 1. We could do this in one runbook but it might be a better idea to split it up, so we can re-use and share code in other scenarios.

Figure 1
In the following example, shown in figure 2, we monitor Service Manager for new incident that don’t have a support group configured, we do this every 10 minute and if we find a incident that don’t have support group set, we update it. The “SCSM_Search_IR” runbook pass the found incident ID and new support group to the “SCSM_Update_IR” runbook.

Figure 2
We build the “Monitor” runbook with input parameters for “Search” runbook and interval, so the same “Monitor” runbook can be used in multiple scenarios. The “Action” runbook have input parameters for the incident to update and support group to set, so we can reuse the runbook in other scenarios were we need to set support group for an incident. We can start the “Monitor” runbook multiple times, for example if we need to monitor Service Manager for incident with specific state every five minutes we can start a new instance of the “Monitor” runbook. If the action is to update the incident with new support group we can reuse the current “Action” runbook, just need to write a new “Search” runbook. This example is shown in figure 3.

Figure 3
Let’s look at runbook examples.
The “Monitor” runbook
This is the “Monitor” runbook that runs based on an interval and starts a “Search” runbook.
workflow blog_monitor {

param (

# Mandatory parameter of type INT, number of seconds between loops

[parameter(Mandatory=$true)]

[int]$Interval,

# Mandatory parameter of type String, name of search runbook

[parameter(Mandatory=$true)]

[string]$SearchRunbook

)
$WAP = Get-AutomationVariable -Name ‘SMA-WebServiceEndpoint’
while($true)
{
start-sleep -s $Interval
Start-SmaRunbook -Name $SearchRunbook -WebServiceEndpoint $WAP
}
}
The “Search” Runbook
This is the “Search” runbook. It search for incidents created since last run with blank support group setting. The runbook use a variable (blog_search_SCSM) to keep track of processed incidents. If it finds an incident it starts the “SCSM_SetTier” runbook and pass the incident ID and new support group (tier).
workflow blog_search_SCSM

{

$SCSMServer = Get-AutomationVariable -Name 'Service Manager server'

$fromdate = Get-AutomationVariable -Name 'blog_search_SCSM'

$wap = Get-AutomationVariable -Name 'SMA-WebServiceEndpoint'

inlinescript {

$class = Get-SCSMClass -computername $using:SCSMServer -Name System.Workitem.Incident$

$incidents = Get-SCSMObject –Class $class –filter "CreatedDate > $using:fromdate" -computername $using:SCSMServer | where{$_.tierqueue -eq $null}

ForEach ($incident in $incidents) {

Start-SmaRunbook -Name scsm_set_tier -Parameters @{"IRid"=$incident.ID; "Tier"="Tier 1"} -WebServiceEndpoint $using:wap

}

}

$fromdate = get-date -format G

Set-AutomationVariable -Name 'blog_search_SCSM' -Value $fromdate

}
The “Action” runbook
This is the runbook that sets support group for an incident
workflow scsm_set_tier

{

param (

# Mandatory parameter of type String, id of Incident

[parameter(Mandatory=$true)]

[string]$IRid,

# Mandatory parameter of type String, name of new support group

[parameter(Mandatory=$true)]

[string]$Tier

)

$SCSMServer = Get-AutomationVariable -Name 'Service Manager server'

inlinescript {

$class = Get-SCSMClass -computername $using:SCSMServer -Name System.Workitem.Incident$

$incident = Get-SCSMObject –Class $class –filter "ID -eq $using:IRid" -computername $using:SCSMServer

$incident | Set-SCSMObject -ComputerName $using:SCSMServer -Property tierqueue -Value "$using:Tier"

}

}
Test it
To start these runbooks start the “Monitor” runbook and fill in the parameters. After a while we can see the different runbooks are running or has ran


These examples are written in a very “raw” format, to show clean examples. It is a good idea to add for example error handling, logging and parameter validation. In some scenarios it can also be an idea to combine some of the runbooks. When you use a variable for “checkpoint” it is important to understand that only one instance of the runbook can be running. In this scenario it is not an issue as we will only have one runbook running looking for new incidents without support group.
Note that this is provided “AS-IS” with no warranties at all. This is not a production ready solution, just an idea and an example.
Building a SMA activity for Service Manager
Service Manager and Orchestrator are well connected with a connector. It is easy to use Orchestrator runbooks as activities in for example change requests and service requests. When SMA was released as part of Orchestrator 2012 R2 a number of customers asked how to use SMA runbooks as activities in Service Manager. Some runbooks running in (classical) Orchestrator would fit better in SMA, for example long running jobs that can benefit from check pointing and also jobs that need to scale large.
In this blog post I will show you a way to quickly create an activity for Service Manager to start a specific runbook. The example will trigger a SMA runbook from Service Manager through the SMA web service. SMA will then execute the runbook and update the Service Manager SMA activity, mark it as completed. In this example we will invoke a SMA runbook that build new VMs in Windows Azure. We could build a new VM with the Windows Azure integration pack in Orchestrator runbook designer too, but it is handy to use Powershell in this scenario and if we want to build multiple VMs at the same time SMA can use parallel execute to save some time.
These are the steps we need to take
- Install SMA powershell module on the Service Manger management server running workflows
- Install SMLets on the Service Manger management server running workflows
- Create a new activity that starts a SMA runbook in a new management pack
- Import the management
- Use the new activity in any work item
SMLets is a PowerShell module built by the community. It can be used to automate common tasks in Service Manager. You can download SMLets here. The SMA PowerShell module can be found on the Orchestrator 2012 R2 installation media.
Building the SMA activity
First step is to build the SMA activity. We can use the Service Manager Authoring Tool for that.
- Start the Service Manager Authoring Tool
- Service Manager Authoring Tool, click File and select New
- New Management Pack, input the name for the new management pack, for example Contoso.SMA. Click Save
- In the Management Pack Explorer, right-click Classes and select Create Other Class
- Base Class, select Activity and click OK
- Create Class, input Contoso.SMA.DeployVM, click Create
-
In the class properties list, delete the default property named Proerty_XX

We will create two new properties on the new class, on for virtual machine name (VMName) and one for virtual machine size (VMSize). We will configure the VMSize property with data type List. In Service Manager we will configure a list of values used to select virtual machine size.
- Click Create property and input VMName as internal name, click Create
- Click Create property and input VMSize as internal name, click Create
- In the Details pane for the VMSize property, change Data Type to List
- In the Select a list dialog box, click Create List
- Create List, input VMSizeList as internal name and VM Size as Display name. Click Create
- In the Select a list dialog box, select the new VM Size list, click Ok

- In the Management Pack Explorer, right-click Workflows and select Create
- Create Workflow Wizard, General, input ContosoSMAInvokeRunbook as name. Click Next
- Create Workflow Wizard, Trigger Condition, select Run only when… click Next
- Create Workflow Wizard, Trigger Criteria, click Browse and select the Contoso.SMA.DeployVM class. Change Change event to When an object of the selected class is updated, click Additonal Criteria
- Pick additional criteria, click the Change To tab, add Criteria as
[Activity] Status equals In Progress
Click Ok

- Create Workflow Wizard, Trigger Criteria, click Next
- Create Workflow Wizard, Summary, click Create
- Create Workflow Wizard, Completion, click Close
- Once you click Close the workflow designer will be displayed. Add a Windows PowerShell Script to the workflow

- We will configure the WindowsPowerShell activity to run a Powershell script to start the SMA runbook. Select the WindowsPowerShell activity, in the Details pane click Script Body

- Configure a Script Activity, paste the following script to the Script Body text fieldimport-module SMLets
$size1 = “$InstanceSize”
$size2 = $size1 -replace “{“, “”
$size3 = $size2 -replace “}”, “”
$size4 = get-scsmenumeration -id $size3
$SizeName = $size4.DisplayName
Start-SmaRunbook -WebServiceEndpoint https://wap01 -Name “SCSM__Deploy_New_VM” -Parameters @{“InstanceSize”=”$SizeName”; “VMName”=”$VMName”;”ActivityID”=”$ActivityID”}The script first imports the SMLets PowerShell module. The SMLets module is used to convert the GUID for the list value (enum value) into displayname. For example from Service Manager the workflow gets {300dfe04-a0a0-e5fc-8892-963e7146d86c} instead of Medium, as VM Size. Before we can convert the GUID into a displaystring we must remove “{” and “}”, which the two replace lines do. We then start the runbook and pass on three parameters, VM name, VM Size and the activity ID. This example script starts a SMA runbook named SCSM__Deploy_New_VM and the SMA web service has adress https://wap01 - Configure a Script Activity, click Script Properties. Create three parameters. Use class properties from the Contoso.SMA.DeployVM class for all three parameters. Use the ID property from the class for the ActivityID property. Click OK

- The activity and management pack is now ready to import. Great work! Save the management pack in the Service Manager Authoring Tool
- Copy the workflow dll, ContosoSMAInvokeRunbook.dll from the management pack folder to Service Manager installation folder (C:\Program Files\Microsoft System Center 2012 R2\Service Manager) and then restart the Microsoft Monitoring Agent on the Service Manager management server running workflow
- You can now open Service Manager console and import the management pack
- In the Service Manager Console, browse to Library and Lists, open the VM Size list
- List Properties, add the following items, that are all Azure VM sizes, click OKExtraSmall
Small
Medium
Large
ExtraLargeFor more information about Windows Azure VM sizes look at http://www.windowsazure.com/en-us/pricing/details/virtual-machines/ - In the Service Manager Console, browse to Library and Templates, click Create Template
- Create Template, input a name, for example Contoso SMA Deploy Azure VM. Select Contoso.SMA.DeployVM as Class and click OK
- Contoso.SMA.DeployVM Properties, input Contoso SMA Deploy Azure VM as Display Name and click OK
- You can now use the new activity anywhere you like, for example service request templates.

But what about the SMA runbook?
SMA Runbook
The SMA runbook is attached to this blog post. The important part of the runbook, or the really interesting part of it, is the last part of the runbook. This part creates a remote PowerShell session to the Service Manager server (SM01) and marks the activity as completed, the work item will now move on to the next activity.
Inlinescript {
$session = new-pssession -ComputerName SM01
Invoke-Command -Session $session {
$workitem = Get-SCSMObject -Class (get-scsmclass -name Contoso.SMA.DeployVM) | Where-Object {$_.ID -eq “$using:ActivityID”}
$workitem | Set-SCSMObject -Property Status -Value Completed
}
In the Windows Azure Pack portal you can see the SMA runbook start and you can also see the input parameters coming from Service Manager

 Summary
This post show you an example of how to invoke a SMA runbook from Service Manager with a custom activity.
This example is written in a very simply way, no complicated configuration or requirements. For example you might want to add error handling in the script, handle situation when SMLets can’t be loaded or Service Manager can’t be contacted. In both those cases you want to set the activity status to failure in Service Manager. Also it is a good practices to seal management packs that include class structure.
Note that this is provided “AS-IS” with no warranties at all. This is not a production ready solution, just an idea and an example.
Installing the Service Manager Authoring Tool
Today I tried to install the Service Manager Authoring Tool on a couple of different machines. The pre-req check always said that Microsoft Visual Studio Shell 2008 was not installed, but I was sure I did install it. I followed the download link in the Authroing Tool setup and downloaded vs_AppEnvRedistand then I ran that file. After a while I read on this blog about an unsupported modification to skip that pre-check. If I did that unsupported modification the pre-req check did not complain about Visual Studio Shell anymore, but the installation wizard crashed during installation. I then found out that just downloading Visual Studio Shell (vs_AppEnvRedist) and run it did not install it, only extract it to in my example D:\VS 2008 Shell Redist. What we need to do is to browse to that folder and run vs_shell_isolated.enu which actually installed the Visual Studio Shell. After that I could pass both the pre-req check finish eh installation successfully.


Temporary Permissions with System Center
Do you have multiple accounts for administrator of your IT environment? Do you have for example one local administrator account, one Active Directory administrator account, one account to administrate some business service and one account that you use to log on to your workstation and read your e-mail? Do you remember all the passwords? I often see customers having a challenge remember all passwords and when to use which account.
Another funny (or scaring) side of it is that everyone is more or less administrator of everything, it is just a question about clicks. For example an engineer is not a domain admin but administrator of Orchestrators that integrates with Active Directory using a domain administrator account. Another example could be an engineer without any administrator accounts except is Operations Manager administrator, with indirect access to all servers as local system, including domain controllers.
One thing that also crossed my mind is why do so many engineers have permissions to do 200 tasks, when you normally only do 20 tasks? Why do you have an account that could delete the entire domain when all you do is reset passwords and add members to groups? There is an imminent risk of human errors.
I am no security expert but I want to show a way to minimize number of administrator accounts floating around, and maybe minimize human errors. The scenario is that no engineers have more than one account. That account is a normal user account, no special administrator permissions at all. When the engineer are about to do something special he or she request permissions and also describes the work that will be done. The engineer also select number of hours permissions are needed.

Figure 1 The Service Request form
The service request templates includes the following activities
- Runbook, update approval step. This step will look which system the requester has requested permissions to, and then depending on the system configure the manual approval step. If it is for example Active Directory the runbook activity will add a group of people that can approve Active Directory permissions.
- Review Activity, “managers” or “owners” approve temporary permission
- Runbook, grant temporary permissions. A runbook grants the requester permission to the system

Figure 2 Service Request Template
The first runbook, 2.7.2 in this scenario, is the runbook that will update the review activity based on the request. The review activity is configured in the service request template without any reviewers, it is the 2.7.2 runbook that will populate the list of Reviewers. A dynamic approval step J

The second runbook, 2.7.1 in this scenario, is the runbook that will grant permission to the requester. It gets the user requesting permissions and add that user to a group in Active Directory. The Map System To Group activity will decide which security group to add the user to, depending on system. In the end of the runbook it updates the service request with information that permissions has been granted and when the permissions will be removed. The Format Timestamp activity is used to get expire time for the permissions. But there is one more extra important activity in the runbook. The Write to Temp Permissions database activity. For each permission granted this activity writes a row to a SQL database.


Figure 3 Temp Permissions database
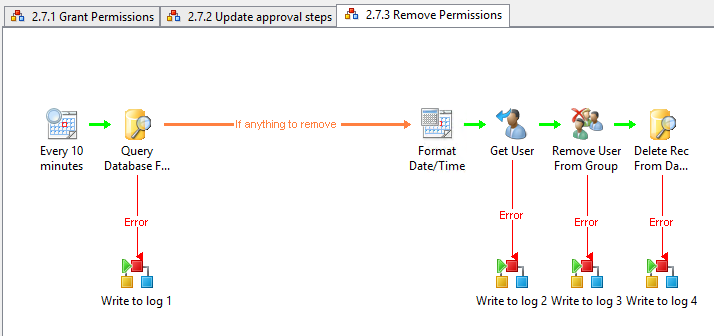
The last runbook, 2.7.3 in this scenario, is removing permissions. Every 10 minutes it query the Temp Permissions database for permissions to remove. If there is any permissions to remove, based on the ExpireDate column, the runbook will remove the user from the security group and remove the record in the database. There will still be logs in the technical log database for Orchestrator, more info about logs here. You will also have a work item, a Service Request, in Service Manager which information about the temporary permission, including requester, approver, description and system.
You can download the runbooks, 20131204_TempPermissions. Note that this is provided “AS-IS” with no warranties at all. This is not a production ready solution, just an idea and an example.
Compare Software on Computers
From time to time you need to compare what software are installed on two computers. For example when using a test environment to test a new release of a software you want to make sure the test environment has same version installed as the production environment. Service Manager includes all this information as it synchronize it from Configuration Manager and Operations Manager. Unfortunately there is no out of the box report or feature to do this. I guess we could do it with Service Manager Powershell but for an Orchestrator geek like me it is much fast done with a runbook J
Figure 1 shows the master runbook. It invokes three other runbooks, one to gather all installed software, one to compare installed software and one to find all software installed on both computers. The solution use a temporary SQL table to store data. The result, a report, is sent to the Service Request “requester” by e-mail. In the start of the master runbook there are three Service Manager Activities, these are used to get the “requester”. The Send Email activity in the end use this information to send the report file.
Figure 2 shows runbook 8.3.2. This runbook first drops the temporary table if exists. The temporary table is named based on the computer name, if we have ran a comparison before, we delete the temp table. The master runbook will also delete temporary table, but if there is a “left over” from another job it is deleted in the 8.3.2 runbook and also we want to make sure no old data is affecting our new report. The 8.3.2 runbook gets all the installed software on one computer and insert it into the temporary SQL table. The runbook insert both software display name and GUID. Two software could be named the same, so then we also compare GUID of the CI. If we were interesting in installed patches we could use Software Updates class instead of the Software Items class. We run runbook 8.3.2 once of each computer.
Figure 3 shows runbook 8.3.2. This runbook use a SQL query to find software installed on one computer but not the other one. We run runbook 8.3.2 once for each computer.
Figure 4 shows runbook 8.3.4. This runbook use a SQL query to find software installed on both computers.

Figure 1. Master runbook

Figure 2. Runbook 8.3.2

Figure 3Runbook 8.3.3

Figure 4 Runbook 8.3.4
I use Service Manager Portal to submit a service request which will start a runbook activity, runbook 8.3.1. Figure 6 shows an example report, delivered by e-mail. The report is very basic, built in HTML. You could re-design it easy by changing HTML code in the runbook.

Figure 5

Figure 6 Report
You can download the runbooks, CompareSoftware. Note that this is provided “AS-IS†with no warranties at all. This is not a production ready solution, just an idea and an example.
State tracking and logging in Orchestrator
If you have an Orchestrator environment with multiple runbook servers might have notice that when a runbook failover to secondary runbook server the runbook restarts at the first activity. Let’s say you have a runbook that creates a new user account, a user folder and deploy a computer to a client. If that runbook is interrupted between creating the user folder and deploying the computer it will failover to secondary runbook server and restart at creating the user account. The issues with this is this, in this example, is that you will end up with multiple user accounts for the same user, or the runbook will crash as it tries to create the same user account again. In other scenarios it could cause multiple installation of patches, multiple restarts of a server or multiple deployed of the same VM.
In this blog post I will show a couple of alternatives to handle state tracking. I will also include an example on logging for your runbooks. In my examples I use a SQL table to store logs from all runbooks.
SQL
For all state tracking you need to have a unique ID of the runbook job. If the runbook only runs in one instance you could use the runbook name or activity ID, but often the same runbook can run in multiple instances at the same time.
First alternative is to use a SQL table. I often create a database called OrchestratorTool or something similar to store logs, temp data and so on, in this database I create tables for different runbooks. It is often complicated to use the same table for state tracking from multiple runbooks.
Figure 1 show a “master” or “parent” runbook that invokes three other runbooks. This runbook is used from Service Manager when order a new user account, it creates an account, a user folder and a workstation. The “master/parent” runbook is the runbook that we use as a runbook activity in Service Manager. The Service Request ID (SR) from Service Manager is the unquiet ID that these runbooks use to do state tracking. After each Invoke Runbook there is a check to make sure the runbook returns “something” and not NULL. In the end of the runbook it updates the service request in Service Manager with the result, for example account name. If any of the three Invoke Runbook activities returns NULL I want the runbook to stop, I use the Fail Runbook activity to do this. The Fail Activity runbook is a Query Database activity with incorrect configuration. This will make sure the runbook stops. All the “Write to log…” Invoke Runbook activities invoke a runbook that will write data to a log table in a SQL database. Figure 2 show configuration example of a “Write to log” Invoke Runbook activity. Figure 3 show the runbook that writes to the log table.

Figure 1

Figure 2

Figure 3
Figure 4, 5 and 6 shows the different runbooks that the “master/parent” runbook invokes. Each of these runbooks starts by checks if for example a folder has been created for the service request. If the folder is not created it will create a folder and update the tracking database table with info. If there is already a folder in the tracking database table for this service request it will publish that information back to the “master/parent” runbook. Each runbook also includes a couple of “Write to log” invoke runbook activities to write data to the log table in SQL. If any of these runbooks fails the error will be written to the log table and the “master/parent” runbook will fail, with the “Fail runbook” activity. As you can see in figure 2 the severity is CRITICAL, when a runbook sends CRITICAL severity to the log runbook (figure 3) it will generate an alert in Operations Manager with the info and write it to the log table. This means that each runbook don’t have to include “Create Alert” activities to generate an alert in Operations Manager, they just need to write a CRITICAL event to the log table.

Figure 4

Figure 5

Figure 6
With the SQL alternative the “master/parent” runbook can be restarted multiple times and each “child” runbook will check if has already ran for the service request. We use a table in a SQL database to store the state of each service request. We need another runbook to clean up the state table in SQL, or do it as a last step in the “master/parent” runbook.
Service Manager
The second alternative is to use Service Manager to store the state of the runbook. In this alternative each runbook is independent of each other, we don’t have a “master/parent” runbook, and instead each “child” runbook is its own runbook activity in Service Manager. Servicedesk operators can easy re-start or skip an activity if needed and customer can track each step. If you have only one huge runbook activity, invoke a “master/parent” runbook that then invokes 50 other runbooks, it is very difficult to troubleshoot or restart.
When we build runbooks that handle success, warning and failure from all activities the runbook always ends with a success. Figure 7 show an updated version of the runbook shown in figure 5, to create the account I Active Directory. If for example the Create User activity fails the runbook will go to the Write to log – Can’t Create Account activity. That activity will invoke a runbook and write information to the log. That invoke runbook activity will most likely work, so the runbook will end as a success even if it was not a success, we couldn’t create the account in Active Directory. That is the reason for the “Fail Runbook” activity, which will make sure the runbook crash. The Fail Activity runbook is a Query Database activity with incorrect configuration. This will make sure the runbook stops.
In the end of the runbooks shown in figure 7, 8 and 9 you can see an “Update RB Activity” activity. This activity will write the result of the runbook, for example an account, to TEXT1 of the runbook activity. Each instance of a runbook activity has a number of text fields that you can use to store information. In figure 8 you can see that we use “Get Related RB activities” based on the Service Request to get the runbook activity named something with 9.2.1. 9.2.1 Is the runbook that create the account, shown in figure 7. The runbook in figure 8 then readers TEXT1 from that runbook activity and use it as input when create the folder.

Figure 7

Figure 8

Figure 9
The log table I use for these examples looks like the table in figure 10. The SQL state tracking table I use for the first example looks like the table in figure 11.

Figure 10

Figure 11
Download my example runbooks, StateTracking.
Note that this is provided “AS-IS” with no warranties at all. This is not a production ready management pack or solution, just an idea and an example
Copy Notes between Manual Activities
Let’s say you have multiple manual activities in a service request. Each of these manual activities need the output of previous manual activities. For example the first manual activity creates a user account for a new hire. Then the second manual activity is adding this user account to a HR system. The first engineer can input a comment, the user account, when the activity is marked as completed in the self-service portal. But the second engineer need to click a lot to see the note from the first engineer.
- Parent work item
- See details
- Related Items
- Contains Activity
- Expand Manual Activity
- Find the correct activity and click it
- Scroll down and find the correct property
As you can understand it is not easy to find the information, special for some non-technical colleges that don’t understand parent work item and activities.

An alternative to this is to use a runbook between your manual activities. The runbook copy the information between your manual activities, engineers can then see all information from previous manual activities on the first page in the self-service portal. It is the comment/note that previous engineers have input when they mark activities as completed that are copied between manual activities.

In this example I have 3 manual activities in my service request template

It is the same runbook (runbook activity) between each manual activity.


- Initialize Data. Input Service Request work item ID and Runbook Activity work item ID
- Read the Runbook Activity
- Read the Service Request
- Get Related Manual Activities for the Service Request
- Read each related manual activity
- Compare Value. Checks if the manual activity sequence number is the one before the runbook activity sequence ID. All activities in the service request has a sequence ID, we need to find the one before the current runbook activity. This Compare Value activity checks if the manual activity sequence ID equals “runbook Activity sequence ID minus 1”
- Reads the manual activity before the runbook activity
- Again, gets all related manual activities
- Again, read each related manual activity
- Again, compare values. Same as previous compare value but this time we look for the manual activity with sequence ID after the runbook activity
- Update the manual activity after the runbook activity with information from the manual activity before the runbook activity
- Return data without any configuration
You can download my example runbook, 20130708_CopyMA_wolf . Note that this is provided “AS-IS” with no warranties at all. This is not a production ready management pack or solution, just an idea and an example
Update Service Manager SLA thresholds with Orchestrator
From time to time I get the question if it is possible to pause a SLA in Service Manager. You should write your SLA in a way that you never have to think about pause them. For example if you have a SLA saying you will fix hardware issues in 8 hours, but your hardware vendor has agreement saying they will send you spare parts in 4 days, you need to re-write your SLA. Another example could be a SLA saying an incident will be resolved within 8 hours. If you are dependent on end-users that might be difficult to fulfill, instead write SLA based on first response. Why write a SLA that you can never fulfill?
In this blog post I will show how to modify the SLA endtime with a runbook. This runbook dont pause the SLA, it just adds minutes to the TargetEndDate and the TargetWarningDate for incidents in a “Waiting for end-user” status.
![]()
- Monitor Date/Time. The runbook trigger every 5 minutes
- Get Object. Gets all incidents in “Waiting for end-user” status
- Link. If there are more than one incident
- Get Relationship. Gets related Service Level Instance Time Information
- Get Object. Reads the Service Level Instance Time Information instance
- Format Date/Time. Takes the current TargetEndDate as input and adds 5 minutes on Format Result output
- Format Date/Time. Takes the current TargetWarningDate as input and adds 5 minutes on Format Result output
- Update Object. Updates the related Service Level Instance Time Information instance with new TargetEndDate and TargetWarningDate

The result is that every 5 minutes when the incident is in “Waiting for end-user” state the runbook will add 5 minutes to both the SLA Warning time and the SLA End time. You can download my example file, PauseSLA_wolf. Note that this is provided “AS-IS†with no warranties at all. This is not a production ready management pack or solution, just a idea and an example
Recent Comments