Home » Articles posted by Anders Bengtsson (Page 21)
Author Archives: Anders Bengtsson
 Exchange mail flow check with Opalis and Operations Manager
Auto Close Incidents
I have a couple of Service Manager customers that want to automatically close incidents one day after they are resolved by a analyst. It will save them some manually work. In this post I will show you how to build a workflow that does this. The following example will close incidents that has been in resolved state for two hours. This workflow require smlets that you can download here.
- Start the Service Manager Authoring Tool.
- Create a new management pack, for example Contoso.AutoClose
- Create a new workflow
Name: ContosoAutoCloseWF
Run at a scheduled time or at scheduled intervals
Other interval, 2 hours - Drag and drop the “Windows PowerShell Script” activiti from the toolbox to your workflow

- In the Details pane, click “Script body”
- Input the following script in the script bodyGet-SCSMIncident -Status Resolved -InactiveFor 02:00:00 | Set-SCSMIncident -Status Closed -comment “Closed due to duration of resolved period”The 02:00:00 is a TimeSpan declaration where 2 is the number of hours by hh:mm:ss. Observe that this will use the “lastmodified” timestamp for comparison and not the “resolved date”.
- On the script properties tab, input smcomlets as windows powershell snap-in required by the script
- Copy the ContosoAutoCloseWF.dll to the C:\Program Files\Microsoft System Center\Service Manager 2010 directory on your Management Server
- Import the management pack into Service Manager
- After a couple of hours, navigate to Administration/Workflows/Status and verify that your workflow is working
- Done!
Your workflow will now automatically close all incidents that has been in resolved state for at least two hours, without any update. It will also add a comment to the action log saying “Closed due to duration of resolved period”. If you get any problems with your workflow the look at Travis post about troubleshooting workflows here.
You can download a example of this here AutoClose.
Update: Please note that SMCOMLETS is now named SMLETS. When you import this module or load it on the script properties page, make sure to use the correct name.
Update: Before start working with the cmdlets, please read this blogpost Properly Querying SCSM Using SMLets Get-SCSMObject cmdlet
Reset Password with Service Manager
A common task for service desk is to reset an end-user password. A common scenario is that the operator has to fill in an incident form, start Active Directory Users and Computers console, find the user, reset the password, notify the password over the phone or send it in a e-mail to the end-user. There are a lot of steps; the operator sees the password and it is not good practise to give out passwords over the phone. In this post I will show you one solution to this issue. I will use a vbscript, a powershell script and the updated version of Patrik’s cmdlets for Service Manager.
The first script, resetpassword.vbs1, will ask the operator for a username and an e-mail address. The username is the user that needs a new password. The e-mail address is the mailbox that will receive the new e-mail. This could be a colleague e-mail address or a private e-mail address of the affected user.
The second script, password.ps1, is a powershell script that will create a closed incident for this task. This script is started by the vbscript resetpassword.vbs. For many service desks it is important to track all calls, and with this powershell script a new incident will be created and closed in the background.
You need to create a task in the console. This task will be used to trigger resetpassword.vbs. Create the task with the following settings:
- Task Name: Contoso – Reset Password
- Description: A task to quick reset a password
- Target class: Incident
- Management Pack: for example Service Manager Incident Management Configuration Library
- Categories: Incident Support Groups Folder Tasks
- Command Line – path: C:\windows\system32\cscript.exe
- Command Line – parameters: C:\scripts\resetpassword.vbs
- Command Line – Working directory: %windir%\system32
- uncheck, log in action log when this task is run
- check, show output when this task is run
This task will trigger the vbscript and will then show the operator two dialog boxes, one for an e-mail and one for a username.

the next dialogue box will ask for an e-mail.

the task will run and after a minute you get

in the console you will see an incident which is closed with some default information

the e-mail with the new password is delivered to the e-mail address

You create a task, the task triggers the vbscript resetpassword.vbs. The vb script asks for a username and an e-mail address. The script will then generate a complex password (thanks to Martijn Haverhoek). The new password will be sent in an e-mail to the specified e-mail address.
You can download my scripts here.
To get this to work in your environment you need to customize the scripts a bit. You first need to download the Service Manager cmdlets from Codeplex and install them. In the resetpassword.vbs script you will need to change the domain LDAP path (around line 20), e-mail settings (around line 62), domain name (around line 82) and script paths (around line 90).
Handle VIP Users in Service Manager
From a number of Service Manager customer I have received the question about VIP users. How can we mark incidents from VIP users? In this post I will show you one way to handle incidents incidents from VIP users. We will first extend the domain user class with a new VIP property, then use the default incident workflow to update incidents from VIP domain users.
Use the Service Manager Authoring Tool to extend the System.Domain.User class in the System.Library management pack.
- In the Authoring Console use the class browser to find the “Domain User or Group” class. Right-click it and select View
- In the Management Pack Explorer pane right-click “Domain User or Group” and select extend class
- Select a management pack, for example create a new one named Contoso.VIP
- Click Create Property
- Input a internal name, for example isVIP
- Select the new property, then in the details pane configure Data Type to BOOL
- Save your management pack and import it into Service Manager

The next step is to configure the incident workflow. We will use the default incident event workflow so no more authoring console for now.
- In the Service Manager console, navigate to Administration/Workflows/Configuration
- Click on Incident Event Workflow Configuration, then click Add in the dialog box
- Input a suitable name for example Contoso – Update VIP Incidents
- Configure, Check for events: When an incident is created
- Configure Event criteria according to the picture below
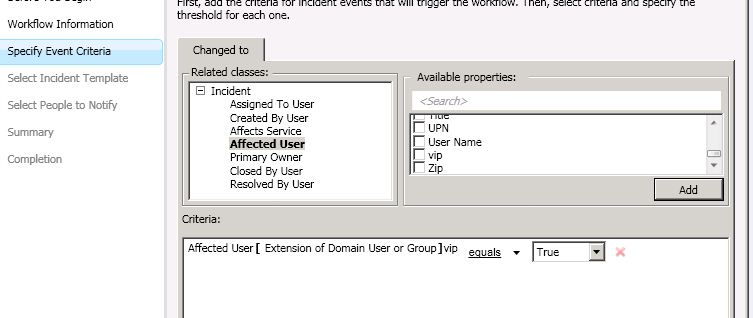
- Choose to apply the default “High Priority Incident Template”. This template will change priority and urgency to high and also assign it to support tier 1. You could of course use any template here.
- Choose if you want to notify anyone, that might be a good idea in some scenarios
- Save your new workflow.
Now, update one of your user CI to be a VIP. The VIP property is on the Extension tab of a user CI. After that, when you create a new incident for a affected user that has VIP = TRUE the workflow will kick in and update both priority, support group and urgency of the incident. You could use the CSV connector to update this isVIP property based on some attribute in AD or a script that checks something in your environment.
Update. Make sure you restart the Service Manager console after you have imported the MP. Else changes to the VIP attribute will not be stored.
Create incidents based on a CSV file
Today I needed to generate incidents based on a CSV file that a external system generated. There are a couple of different ways to do it, but one simple way is to use the Service Manager PowerShell cmdlets that Patrik wrote. In my example I have a CSV file that looks like

I then have a PowerShell script that looks like

The PowerShell script read the CSV file and generate one incident for each line. BF261F09-5FAD-EEA4-24CE-1DA889CEF381 is the LTValue for category “Printing Problem”. For default list values you can use friendly name but for all custom values you need to use the GUID. To get the GUID you need to query the ServiceManager database. You can run the following query to find the GUID for Printing Problems.
SELECT [LTStringId]

,[LanguageCode]

,[ElementName]

,[LTValue]

FROM [ServiceManager].[dbo].[LocalizedText] WHERE LTValue LIKE '%Printing%'
Update: If you need to import incidents that includes "," in for example the description, add "" around the whole description part in the CSV file. For example Incident Title 11,"Description including a , 02 here",Medium,Medium,BF261F09-5FAD-EEA4-24CE-1DA889CEF381,System
Check Last Line Only
I wrote a script to check only the last line of a file. The scripts checks the last line every time it run. If you search my blog you will find a number of script to read logfiles. Create a new two state script monitor where you include the script below. In my example script I looks in the C:\temp\myfile.txt file for the word “Warning” ( varWarPos = Instr(strLine, “Warning”) )
- Unhealthy Expression
- Property[@Name=’Status’] Contains warning
- Healthy Expression
- Property[@Name=’Status’] Contains ok
- Alert description
- You could write any alert description here, but if you include the following parameters you will see the whole line and the status in the alert description.
- State $Data/Context/Property[@Name=’Status’]
- Line $Data/Context/Property[@Name=’Line’]$
Update incidents by e-mail in Service Manager 2010
Update: you can download my scripts here
Out of the box Service Manager 2010 can generate incident based on incoming e-mails. But there is no default feature to update incidents based on incoming e-mails. In this post I will show you a solution to that. The flow of the e-mail will be
- A end-user sends a e-mail to scsm@scsmserver.hq.contoso.local
- The end-user is connected to the normal Exchange server, which will forward all e-mails for the scsmserver domain to my SCSM server
- On the SCSM server a vbscript will see if the e-mail contains “Contoso-IR” or not. If it does the e-mail will be moved to a “UpdateSCSM” folder, else it will be moved to a “NewSCSM” folder. As then it will generate a new incident in Service Manager
- Another vbscript will check all e-mails in the “UpdateSCSM folder”. The script will read “FROM” from each e-mail and which incident to update, it will then kick of a power shell script that will update the incident and attach the e-mail as related item.
Instead of having Service Manager looking at all incoming e-mails the first vbscript will look at them. If the script decides that it is a e-mail that should generate a new incident it will move them over to a another folder and let Service Manager handle it with the default feature. Before you start, make sure to enable incoming e-mails in Service Manager (Administration, Settings, Incident Settings, Incoming E-mails).
The first thing you need to configure is e-mail deliver to a folder. I use my Exchange 2010 machine to send all e-mails for the scsmserver.hq.contoso.local to my SCSM server. On my SCSM server I run IIS and the built-in SMTP feature. It will drop all e-mails to C:\Inetpub\mailroot\drop. I have schedule the following vbscript to run every five minute to sort e-mails. If the e-mail contains “contoso-IR” it will be moved to the UpdateSCSM folder, else to the NewSCSM folder.

Â

Once the e-mail is moved to the new folder, in my case C:\Inetpub\maildrop\drop\newSCSM\, the following scripts looks into it

This script looks in all files and tries to find the incident ID. In the e-mail that SCSM send out to end-users about the incidents the subject contains Contoso-IRXX where XX is the incident ID. The script then take the file patch and the incidnet ID and starts a power shell script. This power shell script, see picture below, runs a cmdlet that my colleague Patrik has build, you can download it here. The Set-SCSMIncident cmdlet let you update a incident. The power shell script input a comment and attach the e-mail as a related item to the incident.

Â
The following five pictures first show the notification template that sends a e-mail to the affected user when a incident is created. As you can see the subject line contains Contoso-IR<Incident ID>, that is also the string that we look for in incoming e-mails. In the last four pictures you can see the e-mail that a affected user recives when a incident is registered. The end-user replies with and includes the Contoso-IRXX in the subject line. In Service Manager the incident is updated in the action log and the e-mail is attached as a attached file.
If you have problem with open EML files, please take a look at this post.


Â
Â
Summer Camp, MMS and TechEd
Microsoft Summer Camp (Stockholm/Gothenburg)
I will be talking at Microsoft Summer Camp 2010. During these two sessions you will get a overview of all the System Center products.
Microsoft System Center
During this day you will get a overview of the System Center products, including System Center Operations Manager 2007 R2, System Center Configuration Manager, System Center Data Protection Manager, System Center Virtual Machine Manager and Service Manager 2010. You will see how the products can work togheter to deliver a dynamic datacenter, including control, security and flexibility. I guess we will talk vNext too :) Sign up for Stockholm or Gothenburg.
Handle your IT processes with Service Manager and Opalis
Service Manager is the latest product in the System Center family, here we connect technique, people and processes. During this session you will see how we can integrate current System Center products to get a dynamic CMDB. We will show you how to handle change management, incident management and problem management. We will also show you Opalis and how Opalis can help us build run book automation and support your processes. Sign up for the session in Gothenburg or Stockholm . Don´t miss this chance to learn a lot and see cool demos!
Best of MMS (Stockholm)
Best of MMS Sweden 2010 will provide the best possible opportunity to learn about the latest IT Management products, solutions and technologies from Microsoft and how to apply them in your organisation. This 2-days event will provide you with an understanding of the latest technical updates on Desktop, Datacenter and Cloud management features and solutions from Microsoft. The event will covering current System Center products as well as a lot of information about vNext. I will be talking about Operations Manager (of course!) and Service Manager during this event. More info here
Microsoft TechEd Europe (Berlin)
I just signed up for Microsoft TechEd Europe in Berlin. It is a couple of months away, but sign up now to get the best price and hotels. I will be working among the System Center booths so please stop by and discuss all the cool products and features in the current versions and in vNext. More info here. See you in Berlin.
Active Directory connector behavior
This week my friend Patrik Sundqvist and I delivered a Service Manager event together with Microsoft in Sweden. There were a lot of good questions from the audience and a great interest in the product. One of the questions was if the Active Directory synchronize blank attributes from Active Directory if there is a value in the CMDB. Of course we have tried this in a sandbox J
1. I created a new user account in Active Directory. I did not change any default values so the Office attribute (PhysicalDeliveryOfficeName) was set to < Not Set >
2. I ran the Active Directory connector synchronization
3. I verified that I had a blank Office attribute in the CMDB
4. I updated the attribute in the CMDB
5. I logged in and out with the account on a workstation
6. I ran the Active Directory connector synchronization
7. The Office attribute in the CMDB is back to blank
If my AD user object is updated, in this case some attributes was updated when the user loged into a workstation, the watermark on the user object is updated, then the whole user will be synchronized back to the CMDB.
Remember this! What you see is not always what you think in Service Manager. You might think that looking at a computer in the computer form is in fact looking at a single object in the CMDB. This is seldom the truth since most forms in Service Manager targets TypeProjections (which could be seen as a view displaying data from several objects related to each other). As an example you might take a look at the type projection acting as source to the “computer form†in Service Manager. As you can see in the definition below, quite a few different objects support the computer form.
Microsoft.Windows.Computer.ProjectionType :
<TypeProjection Accessibility=”Public”>
<Component Path=”$Context/Path[Relationship=’ConfigurationManager!Microsoft.SystemCenter.ConfigurationManager.DeployedComputerRunsWindowsComputer’ SeedRole=’Target’]$” Alias=”PhysicalComputer” />
 <Component Path=”$Context/Path[Relationship=’Windows!Microsoft.Windows.ComputerHostsOperatingSystem’]$” Alias=”OperatingSystem” />
 <Component Path=”$Context/Path[Relationship=’Windows!Microsoft.Windows.ComputerHostsLogicalDevice’ TypeConstraint=’Peripherals!Microsoft.Windows.Peripheral.NetworkAdapter’]$” Alias=”NetworkAdapter” />
<Component Path=”$Context/Path[Relationship=’Windows!Microsoft.Windows.ComputerHostsLogicalDevice’ TypeConstraint=’Peripherals!Microsoft.Windows.Peripheral.Processor’]$” Alias=”Processor” />
<Component Path=”$Context/Path[Relationship=’Windows!Microsoft.Windows.ComputerHostsLogicalDevice’ TypeConstraint=’Peripherals!Microsoft.Windows.Peripheral.PhysicalDisk’]$” Alias=”PhysicalDisk” />
<Component Path=”$Context/Path[Relationship=’Windows!Microsoft.Windows.ComputerHostsLogicalDevice’ TypeConstraint=’Peripherals!Microsoft.Windows.Peripheral.LogicalDisk’]$” Alias=”LogicalDisk” />
<Component Path=”$Context/Path[Relationship=’System!System.ComputerPrimaryUser’]$” Alias=”PrimaryUser” />
<Component Path=”$Context/Path[Relationship=’System!System.ConfigItemOwnedByUser’]$” Alias=”Custodian” />
<Component Path=”$Context/Path[Relationship=’WorkItem!System.WorkItemRelatesToConfigItem’ SeedRole=’Target’]$” Alias=”ImpactedWorkItem” />
<Component Path=”$Context/Path[Relationship=’WorkItem!System.WorkItemAboutConfigItem’ SeedRole=’Target’]$” Alias=”RelatedWorkItem” />
<Component Path=”$Context/Path[Relationship=’SupportingItem!System.ConfigItemHasFileAttachment’]$” Alias=”FileAttachment” />
<Component Path=”$Context/Path[Relationship=’System!System.ConfigItemRelatesToConfigItem’]$” Alias=”RelatedConfigItem” />
<Component Path=”$Context/Path[Relationship=’System!System.ConfigItemRelatesToConfigItem’ SeedRole=’Target’]$” Alias=”RelatedConfigItemSource” />
<Component Path=”$Context/Path[Relationship=’CoreKnowledge!System.EntityLinksToKnowledgeDocument’]$” Alias=”RelatedKnowledgeArticles” />
       </TypeProjection>
A short summary of this is â€last-write wins†and that you should be very aware that a form can be a mix of the result of a number of connectors and synchronized data.
Culture ‘en’ is a neutral culture
Last week when working with Service Manager I found this event again, in the Operations Manager log on the Service Manager server. Event ID 33880 from Health Service Module. It is generated when you try to send notification to a user, for example affected user, with a notification template that don’t support the user CI localization settings. More information about that scenario here. How to fix it? Make sure you have the same localization settings in your notification template and on your user CIs.
A Windows Workflow Foundation workflow failed during execution.

Workflow Type: Microsoft.EnterpriseManagement.ServiceManager.Incident.Workflows.

AutomaticIncidentChangeWorkflow

Workflow Identifier: 742dc6d1-90cf-9834-044f-9906bcf9dbf9

Exception Type: System.NotSupportedException

Exception Message: Culture 'en' is a neutral culture. It cannot be used in

formatting and parsing and

therefore cannot be set as the thread's current culture.

Exception Stack: at System.Globalization.CultureInfo.CheckNeutral

(CultureInfo culture)

at System.Globalization.CultureInfo.get_DateTimeFormat()

at System.DateTime.ToString(IFormatProvider provider)

at Microsoft.EnterpriseManagement.Notifications.Workflows.IReplaceableToken.

GetLocalizedPropertyValue(UserSettings settingsIn,

EnterpriseManagementObject instance)

at Microsoft.EnterpriseManagement.Notifications.Workflows.TokenizedMessage.

PopulateTokenValues(UserSettings userSettings,

EnterpriseManagementObject instance,

Dictionary`2 relationshipIdToInstanceToRelatedObjectMapping)

at Microsoft.EnterpriseManagement.Notifications.Workflows.RecipientGroupMessage.

PopulateTokenValues(UserSettings userSettings,

EnterpriseManagementObject instance, Dictionary`2

relationshipIdToInstanceToRelatedObjectMapping)

at Microsoft.EnterpriseManagement.Notifications.Workflows.SendNotificationsActivity.

Execute(ActivityExecutionContext executionContext)

at System.Workflow.ComponentModel.ActivityExecutor`1.Execute(T activity,

ActivityExecutionContext executionContext)

at System.Workflow.ComponentModel.ActivityExecutor`1.Execute(Activity activity,

ActivityExecutionContext executionContext)

at System.Workflow.ComponentModel.ActivityExecutorOperation.Run

(IWorkflowCoreRuntime workflowCoreRuntime)

at System.Workflow.Runtime.Scheduler.Run()
Business Services in Service Manager
Business Services in Service Manager 2010 is a way for you to present your services, both IT components within it and properties of it like affected users and SLA level. Business Services often start in Operations Manager as a distributed application. You then import the same management packs into Service Manager to get the structure of your application. After that you use a Operations Manager connector to synchronize components of your distributed application into your business service in Service Manager. In this post I will show you how you could do that.
I have created a simple distributed application in Operations Manager. It is stored in a management pack named “Contoso – myService”.

- What you need to do first is to export the management pack from Operations Manager and import it into Service Manager. You do that from the Administration workspace in both products. Note that you need to import all the management packs that contain a component from your distributed application. For example if you have created a web application check in MP01 and stored your distributed application in MP02, then you need to import both of them. Else, you will not see all components in the business service in Service Manager.
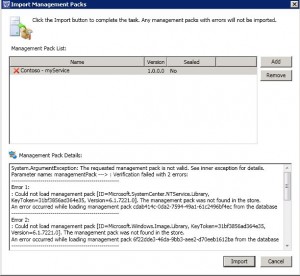
- If this is the first management pack you move over to Service Manager you will probably get a message like this
- The management pack you try to import depends on a number of other management packs and these needs to be imported first. Most o f these you can either download from Microsoft webpage or import from the installation folder of your Operations Manager Root Management Server.
- Once the management pack with your distributed application is imported into Service Manager you will see it under Business Services in the Configuration Items workspace. However there will not be any components in it until you enable synchronization.
- Navigate to the Administrator workspace, expand connectors and open your Operations Manager CI Connector. Refresh the list of management packs and select to synchronize your management pack. Save the setting and start the synchronization of the connector.
- After some time, open the business service configuration item and look at the component tab

You can now fill in the other properties of the business service. Â

What if you want to get alerts from Operations Manager to show up as related incidents, for your service in Service Manager? Service Manager will not connect related incidents and services to each other by default. For example if I get an alert about C: on a logical disk that is in my service component list, the incident will not show up as a related item on my service. The service will not either show up as a related item on the incident. To get this to work you need to generate an alert with the same as the service. In my case an alert named “Contoso – myService”. This can be done with some planning and a couple of dependency rollup monitors in Operations Manager.

Summary: Busniess Services in Service Manager can be used to represent your services within Service Manager. You can merge data and components from other systems like Operations Manager and Configuration Manager and present it as a service. In Service Manager you can fill in information like SLA for the server, contact persons and customers.

Remember that if you change the class structure of your distributed application, dont forget to update the management pack in Service Manager too. If you need to get your incidents in relationship with your services automatically, then start by planning this on a piece of paper, and then create necessary monitors in Operations Manager.
Recent Comments