Home » Articles posted by Anders Bengtsson (Page 13)
Author Archives: Anders Bengtsson
 Custom AEM Report
 Orchestrator Scorecard
Estimate the Orchestrator database size
I often get the question how to estimate the Orchestrator database size. It is not as the other System Center databases where we can simple look at number of agents or objects to handle and then we know the size. The Orchestrator database size depends on a number of parameters. For example
- Number of runbooks and how ofter they run. Each time a runbook runs, it writes data to the database. Orchestrator also stores all configuration information for runbooks in the database. A large number of runbooks uses more space, even if they are not running.
- Amount of data runbooks publish. Recommended for production is to use default logging, no extra logging of specific data. The database size will depend on the amount of data each activity publish
- Log Purge settings. By design, only runbook historical data is groomed from the database. If you create a run-book and later delete the runbook, it remains in the database but marked as deleted.Performing all testing and authoring in a test Orchestrator environment will save you space in the production Orchestrator database. Â The log purge job purges job from the Policyinstances, Objectsinstances, and Objectsinstancedata tables in the Orchestrator database. Data from these tables is shown in the Historical Data pane in the Runbook Designer console. The Log and Log History views show selected data from the Policyinstances table. When you click on a log entry, data for the objects in that policy instance are shown from the Objectsinstances table. When selecting an object, data for that object is read from the Objectsinstancedata table.
A new Orchestrator installation have a database around 3Mb and after we add the System Center 2012 integration packs the size is almost 4 Mb.


Compared with the other System Center 2012 components the Orchestrator database is a quite small database. But it will start grow as soon as you build and run runbooks. On Technet you can find information about how to estimate the database size. But to make it a bit easier I have created a Excel that you can fill in information, and it will show you the database size.

- Fill in runbook names in column A. Copy/pate more rows if needed
- Fill in number of activities in each runbook in column B
- Configure logging level in column C. For production you should configure your runbooks to use default logging configuration
- Column D show you bytes added to the database each time the runbook runs. Number of bytes depends on logging level
- Column E show you Mb added to the database if the runbook runs 500 times. To store info for 500 instances is the default log purge setting
- Fill in number of times the runbook runs per day, in column F
- Column G show you Mb added to the database per day
- Column H show you Mb added to the database for 30 days without any log purge
- Column I show you number of times the runbook will run during 30 days
- Column J show you number of days that 500 invocations takes, for example if the runbook runs 100 times every day column J will show you 5. With default log purge settings you will store data for 5 days for that runbook.
- Cell E15 and H15 show the database size. Column E show it with default log purge settings and column H show it without any purge for 30 days
You can download the Excel file here.
If you want to see which activity is writing the most object instance data in your database you can run this SQL query
SELECT COUNT(OBJECTS.Name) AS Instances,
POLICIES.Name AS Runbook, Objects.Name FROM OBJECTINSTANCEDATA
INNER JOIN OBJECTINSTANCES ON
OBJECTINSTANCEDATA.ObjectInstanceID = OBJECTINSTANCES.UniqueID
INNER JOIN OBJECTS ON OBJECTINSTANCES.ObjectID = OBJECTS.UniqueID
INNER JOIN POLICIES ON OBJECTS.ParentID = POLICIES.UniqueID
GROUP BY Policies.Name, Objects.Name
ORDER BY Instances DESC
Note that the Excel sheet is provided “AS-IS” with no warranties. These figures are not exact, see them as a rough estimates.
Dependencies between runbooks in Orchestrator
Today I received a question if it is possible to see the relationship between runbooks in Orchestrator. Relationships in this scenario is runbooks invoking each other. When you build a library of core runbooks, runbooks providing functions multiple runbooks will invoke and use, it is important not to modify these core runbooks without look at all dependencies. We cant see that relationship in a easy way with the runbook designer console. Of course we can open each invoke runbook activity in each runbook and draw the map manually, but that would take a lot of time. Running a SQL query against the Orchestrator database is a faster solution.
The first step in building that SQL query is to list all invoke runbook activities we have in use. The SQL query below will list all activities, or actually all objects, in the Orchestrator environment not marked as deleted. The Objects table includes for example folders too, so not only runbooks.
SELECT Deleted, Name, ParentID, Description, ObjectType
FROM OBJECTS
WHERE (Deleted = 0)
Scroll down in the result list until you find a Invoke Runbook activity, copy the value from the ObjectType field. With the ObjectType value we can now update the query to only include Invoke Runbook activities.
SELECT Deleted, Name, ParentID, Description, ObjectType
FROM OBJECTS
WHERE (Deleted = 0) AND (ObjectType = ‘9C1BF9B4-515A-4FD2-A753-87D235D8BA1F’)
ParentID is the runbook where the Invoke Runbook activity exists, if we want to show the runbook too, we update the query like
SELECT OBJECTS.Name, OBJECTS.Description, POLICIES.Name AS Expr1
FROM OBJECTS INNER JOIN
POLICIES ON OBJECTS.ParentID = POLICIES.UniqueID
WHERE (OBJECTS.Deleted = 0) AND (OBJECTS.ObjectType = ‘9C1BF9B4-515A-4FD2-A753-87D235D8BA1F’)
The next step is to look at the configuration of the Invoke Runbook activities
SELECT POLICIES.Name AS [Activity Name], OBJECTS.Name AS [Source Runbook], OBJECTS.Description AS [Activity Description], TRIGGER_POLICY.PolicyPath,
TRIGGER_POLICY.TriggerByPolicyPath, TRIGGER_POLICY.TargetActionServers, TRIGGER_POLICY.WaitToComplete
FROM OBJECTS INNER JOIN
POLICIES ON OBJECTS.ParentID = POLICIES.UniqueID INNER JOIN
TRIGGER_POLICY ON OBJECTS.UniqueID = TRIGGER_POLICY.UniqueID
WHERE (OBJECTS.Deleted = 0) AND (OBJECTS.ObjectType = ‘9C1BF9B4-515A-4FD2-A753-87D235D8BA1F’)
In the picture below you see a example result from the query. You can now turn this query around to list all runbooks that invokes a specific runbook, or all runbook invoked by a specified runbook.

Add a new activity to a existing service request
A couple of weeks ago I was working on a scenario were we needed to add a review activity to a service request with Orchestrator. Part of the solution for that scenario were a couple of runbooks that I want to share in this blog post. These runbooks adds a new review activity to a existing service request. All runbooks require a input parameter when it starts, the service request ID. These runbooks set the domain admins group as reviewers in the new review activity.
When adding a new activity to for example a service request it is always added as the first activity. If there are already two activities the new activity is added before them, in other words the new activity is the one that will run first. You can control this by working with the sequence ID parameter. The first activity have value 0 and the second have value 1 and so on. If two activities have the same value they will run at the same time. You can update activities already existing in the service request and insert the new activity in any order you need, as the 70.2 runbook do.
This example is built on three runbooks.
- 70.1. This runbook adds a new review activity to a existing service request. The new review activity is added as the first activity (sequence ID equals 0) and the Domain Admins security group is set as reviewers.
- 70.2. This runbook is used to update current activities with a new sequence ID. The runbook simple add one (+1) to each sequence ID value. This is because in the example we want to add the new activity as the first activity, as we add one to each existing activity there will no longer be a activity with sequence id equals 0. We can then create the new activity and add it with sequence id equals 0.
- 70.3. This runbook is used to get current activities and each sequence ID. The result is written as platform events. This runbook is not really needed but it is nice to have to see the current configuration


The result is that a new review activity is created in the service request. Domain Admins are set as reviewers on the new review activity.

You can download my example runbooks here, 20120730_addActivity_Sanitize , please note that this is provided “as is†with no warranties at all.
In this blog post I show how activities in a service request can be updated by a runbook activity, for example dynamic approval steps.
Idea around Group Management with Service Manager and Orchestrator
One of the most common tasks for an IT department is administration of security groups. Security groups are used to control access to most of today’s applications. Memberships of some groups are modified often, for example group that control access to project work spaces. Often I see this modification handle as a request to service desk that service desk either does it manual or they escalate it to 2nd line that does it manually. Often it is done direct in Active Directory Users and Computers whit a user account that has unnecessary high permissions. The risk of human errors are always there, as often the Active Directory tool is run with a high privilege account and the engineer modifying the group can misunderstand what to do.
In this blog post I will show a idea how to handle group management with the self service portal in Service Manager and configure Orchestrator to execute all modification. A nice benefit by using Service Manager is that you get tracking of everything, who submitted the change, who approved it and so on. A nice benefit of using Orchestrator is that is will be done the same every time and no manual steps are required. In this example a manager, a user that is configured as manager on a security group in Active Directory can, with the self service portal in Service Manager
- Add member to security group
- Remove member from security group
- Request a list of members of a security group
I wrote a blog post a couple of weeks ago around password reset with Service Manager and Orchestrator. This idea around group management is very similar to the password reset idea, for that reason I will not write down all the steps again. Look at the password reset post how this build the integration between Orchestrator and Service Manager. One difference compared with the password reset post is that I use Business Phone instead of Pager to store the manager value. That is affect both runbooks and when you build the portal offering,

The group management idea is built on a number of runbooks
- 10.1.1 Invoke 10.1.2 and 10.1.3 to list group members, update the service request and then send a updated list of members to the manager
- 10.1.2 List group members. This is done with a customer assembly. The Active Directory integration pack includes a “Get Group” activity, but it do not get members of the group, only the group itself. I created a new activity that use Powershell to list group members.
- 10.1.3 Updates the service request with a new description
- 10.1.5 Handle add member to group
- 10.1.6 Handle remove member from group
List group members
A manager navigates to the self service portal and request a list of group members. The manager can select only groups where the manager is owner. Read more about details how that works in the password reset blog post. The 10.1.1 runbook executes, as it is part of the service request template for the list group members offering. The runbook ends with sending a e-mail to the manager. The e-mail contains a list of all members of the security group.


Add/remove member of group
A manager (owner of at least one group) navigates to the self service portal and select either the Add User To Group offering or the Remove User From Group offering. Select which group and input the username of the user to add or remove to/from the security group.


This was a simple example of what you could do with Service Manager and Orchestrator. You can of course add a lot more features and  details. I didn’t spend any time on fault tolerance or error handling in the runbooks as this is an example, but for all production runbooks you should really spend time on that.
You can download my custom assembly file for list group members in Active Directory, Service Manager management pack and Orchestrator runbooks here, 20120716_GroupManagement. Please note that this is provided “as is†with no warranties at all.
Richer Incident Reporting with the Service Manager self-service portal
With default settings you can report incident with the self-service portal in Service Manager. But the form is generic, and often you want to customize it. For example if someone reports a issue with e-mail you might want them to submit some e-mail specific details like Outlook version and location. I was looking into this last week and want to share with you some ideas. We can publish incident templates in the self-service portal the same way we can do with service request. They are both published as request offerings. When we configure a request offering we setup a number of user inputs. We can do this with a incident template too, but there are not many suitable fields on a incident to store custom data, like Outlook version. Instead we can create activities on a incident template and on each of them store data, but out of the box we have only the manual activity to use, and lets say we want to store five custom fields, we don’t want to use five manual activities in the incident template. Instead we can create a new activity class, that includes for example five generic fields. To do that we need to start in the Service Manager Authoring Tool
- Start Service Manager Authoring Tool
- Create a new Management Pack, for example ContosoManualActivity
- Right-click Classes and select Create Other Class
- Base Class, select Manual Activity as base class
- Create Class, input Contoso.Manual.Activity as internal name
- Delete the default property named something like Property_XX
- Click Create property, input internal name, for example text01
- Click Create property, input internal name, for example text02
- Click Create property, input internal name, for example text03
- Click Create property, input internal name, for example text04
- Click Create property, input internal name, for example text05
- Save the management pack
- Seal the management pack, more info how to seal a management pack and generate a key file here
- Start the Service Manager Console, import the seal management pack (mp file)
- Restart the Service Manager console to reload class structure
- In the Service Manager console navigate to Library/Templates
- Click Create Template in the Tasks pane
- Create Template, input a name, for example Contoso – Template – Manual Activity. Select the Contoso.Manual.Activity class (under basic classes). Create a new management pack named for example Contoso Activity where you store the template
- Manual Activity Template, input a title, for example Contoso – Manual Activity. Click OK
- Click Create Template again
- Create Template, input a name, for example Contoso – Template – Mail Incident. Select Incident as class and select the same management pack as before
- Incident Template, configure classification category, source, impact, urgency

- Click on the Activities tab
- Click Add…
- Select a class, select Contoso.Manual.Activity and click OK
- Select Template, select Contoso – Template – Manual Activity
- Click OK
- Click OK to close the Incident Template form
- Time to publish this as a Request Offering. Navigate to Library/Service Catalog/Request Offerings, click Create Request Offering from the Tasks Pane
- Create Request Offering, General,
- input title Exchange Issue
- Template name, Contoso – Template – Mail Incident
- Create Request Offering, User Prompt. Note that we use only strings here. You could configure your management pack properties to be true/false or any other data type. You can then also use the same data type in Service Manager user input, for example let the user select Outlook and Windows version from a drop down menu.

- Create Request Offering, Map Prompts,

- Create Request Offering, Publish. Change Offering Status to Published. Finish the wizard
- Create a new Service Offering, named for example Incident, and include the request offering you just created. Don´t forget to change the service offering status to Published.
- Browse to the self-service portal now
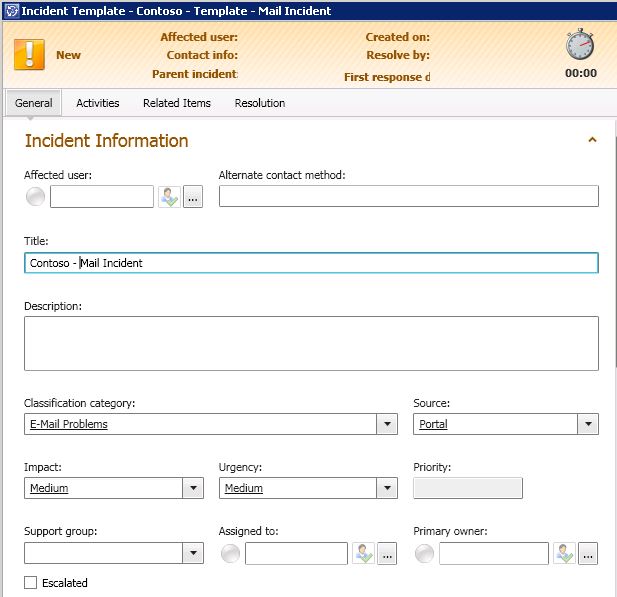


If the user then submits the incident you can see all the custom data under the activities tab. As we added the text fields to the new activity class. That is not optimal to have it there, as it will require some extra clicks to show it.

You can of course solve this with Orchestrator 🙂 I have create a simple runbook that picks up the incident and merge the User Input data with the Description field. The User Input field is a default field on a incident that contains all the data we added to the custom text fields on the activity. You could trigger this runbook automatically when a new incident of this type is created. One thing to think about is that you want to merge the User Input data with the already existing Description field, make sure not to overwrite it. As you can see in the last image we also get the XML code from User Input. I did not create a runbook to clean that, but you could of course do that with a runbook too, to only keep the user input text.
The result, you can use custom input fields, different for different type of incident, to let user report incident with the self-service portal.


As usual thanks to Patrik  for Service Manager authoring support
Please note that this is provided “as is†with no warranties at all.
Password reset with the Service Manager self-service portal
In this blog post I will show you how you can setup password reset with the self-service portal, Service Manager and Orchestrator. The scenario is that a manager should be enable to reset password for colleagues reporting to he or she. The manager could also be something like instructor or teacher for a class. The request offering for password reset should only be shown to members of the “Manager” user role, and the manager should only be enable to reset password for members of their team. To make this work you need to configure the manager attribute on your users in Active Directory, as shown in the image below. We will use a dynamic query based list to show only people reporting direct to the manager. In this example I use Orchestrator to generate a 10 characters complex password, but you could also add “New Password” as a parameter to the service request. Then you input the new password in the service portal. You could also configure the runbook to check the “User must change password at next logon” checkbox on the user account. That check box sometimes result in issues for some applications so I have not included it in this demo.

Runbook

- Start
- Get Runbook Activity. Gets the runbook activity, we submit the ID as a input parameter to the runbook from Service Manager
- Get Related Service Request. We pickup the service request from the runbook activity, by the relationship
- Get Related User. When we configured the query list in Service Manager we configured that the user should be set as a related item to the runbook activity. This activity gets the related user
- Get Service Request. Read the Service Request item
- Get User. Read the User object
- Generate New Password. Generates a 10 characters complex password
- Reset User Password. Set the password to the generated complex password
- Update Service Request. Update the description field on the service request with the new password and account information
The runbook is quite simple, we start with the runbook activity as we get it from Service Manager as ObjectID. We then pickup related service request and user. We generate a new password and set it on the user. We then update the service request with new description, including the new password.
Service Manager Side
- Start the Service Manager console
- Synchronize the runbook over to Service Manager by using the Orchestrator connector
- Navigate to Library/Runbooks, select the runbook (2.2.1 Password Reset) and click Create Runbook Automation Activity Template in the Tasks pane
- Create Template,
- Input a name, for example Contoso – Runbook Activity – 2.2.1 Password Reset.
- Create a new management pack, for example Contoso Password Reset.
- Click OK
- Runbook Activity Template,
- Check Is Ready For Automation
- Input title, for example Contoso – Runbook Activity Template – 2.2.1 Password Reset
- Click the Runbook tab
- Map ObjectID to Object/ID
- Click OK

- Navigate to Library/Templates. Click Create Template from the Tasks pane
- Create Template,
- input name, for example Contoso – Service Request Template – Password Reset
- Select Service Request as Class
- Select the Contoso Password Reset management pack
- Click OK
- Service Request Template,
- Input title, for example Contoso – Service Request – Reset Password
- Click the Activities tab
- Add “Contoso – Runbook Activity – 2.2.1 Password Reset” as activity
- Runbook Activity Template, click OK

- Click OK
- Navigate to Library/Service Catalog/Request Offerings
- Click Create Request Offering in the Tasks pane
- Create Request Offering – General, input title, for example Password Reset
- Create Request Offering – General, select Contoso – Service Request Template – Password Reset as template
- Create Request Offering – User Prompts, add one prompt named User and configure it as query result

- Create Request Offering – Configure Prompts, select the User prompt and select Configure
- Configure Query Results,
- Select Class, change to Combination classes and select User (advanced)
- Configure Criteria, select Manages User and select Pager, click Add Constraint. Configure as image below. Use “Set Token”. Why do we use Pager? The Token: Portal User Name is in format CONTOSO\leni (DOMAIN\username). We don’t store that on a user CI in Service Manager, we store username and domain, but not in that format. Instead I have updated each manager with that information in the Pager attribute, as we don’t use it for anything else in this environment. You can easy update the Pager attribute with a runbook, the export file includes a example of that.

- Display Columns. select User (advanced), the Object/DisplayName and Domain User or Group/User Name

- Options, select “Add User-selected objects to template objects as related item: select the Runbook Automation Activity

- Click OK
- Create Request Offering – Map Prompts,

- Create Request Offering – Publish, change offering status to Published
- Create the request offering
- Navigate to Library/Service Catalog/Service Offering
- Click Create Service Offering from the Tasks pane
- Create Service Offering
- General, fill in title for example Manager
- Request Offerings, add the Password Reset request offering
- Publish, change offering status to Published
- Finish the wizard and create the service offering
- Navigate to Library/Groups. Click New Catalog Group
- Create Catalog items group,
- General, group name, for example Contoso Managers
- Included Members, click Add, add the Password Reset request offering and the Manager Service offering
- Finish the wizard and create the group
- Navigate to Administration/Security/User Roles
- Click Create User Role > End User
- Create User Role,
- General, Name, for example Contoso Managers
- Management Packs, select the Contoso Password Reset management pack
- Catalog item Groups, select Contoso Managers
- Users, add managers
- Finish the wizard and create the user role


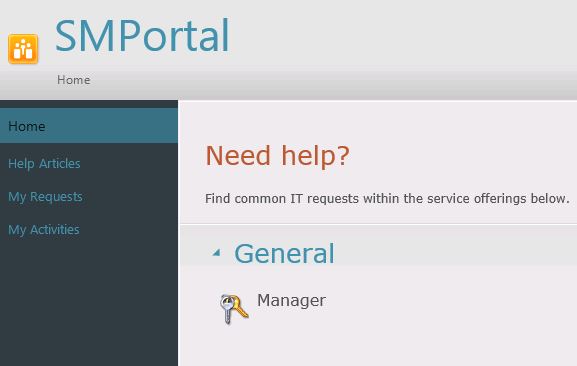


You can download my example runbook here, 20120617_PasswordReset_WOLF
Please note that this is provided “as is†with no warranties at all.
VM lifecycle in Service Manager with Orchestrator magic
A couple of weeks ago I was speaking at a System Center 2012 event in Stockholm/Sweden. My session was around Orchestrator and Service Manager integration. On stage I created and demo a scenario where Service Manager, Virtual Machine Manager and Orchestrator was used to administrate lifecycle of virtual machines and virtual services. My laptop only hosted Orchestrator and Service Manager so in many of the example runbooks I only create a computer object in Service Manager. But as you realize you could re-place that with any kind of Virtual Machine Manager activity. In this post I will share with you the demo files, runbooks and management packs I used.
The demo scenario was that someone could order a virtual machine or a service (service template) from the self service portal in Service Manager. Orchestrator and Virtual Machine Manager then created the machines and so on. When you order a new virtual machine you needed to input a expire date, for how long will you need the virtual machine. You also need to input a cost center, to know who should approve and how will pay for it. When a virtual machine is close to the expire date it is picked up by a runbook that notify the owner. The owner can use the portal to extend the date or simple don’t. If the machine pass the expire date Orchestrator will shut it down. When it has been shut down for some months it is deleted. The demo also showed how to generate reports to follow up which how much each cost center should pay. When the order is complete the user can see the result in the Service Manager portal


The cool thing about this demo is not only that we can create any kind of virtual environment with Virtual Machine Manager 2012, instead of just deploying machines we can follow up on who order, who approved and we can also see how much each cost center is using.
The solution is divided into multiple steps
- Extend the Windows Computer CI class in Service Manager with a couple of extra properties, like order date, cost center, owner, expire date, approver and cost. (MP attached)
- Create a new CI class in Service Manager to store cost information (MP attached)
- Create a runbook that creates computer objects (export file attached)
- Publish a service in the self-service portal in service manager (not included in this post, ping me if you need step by step guide)
- Create a report to follow up number of orders and total cost per cost center
- Create runbooks to administrate removal of expired objects (export file attached)
Extend the Windows Computer Class
To add extra attributes to all Windows Computer CI objects in Service Manager we need to extend the Windows Computer class. We can do that with the Service Manager Authoring Tool, download here. (http://www.microsoft.com/en-us/download/details.aspx?id=28726). When the Authoring Tool is installed follow these steps to extend the Windows Computer class
- We need to seal the management pack we will create in the Authoring Tool. If we don’t seal it we cant use it with Orchestrator or the data warehouse. To seal it we need a keyfile. SN.EXE (.NET Framework Strong Name Utility) is a tool that we can use to generate that key file. Open a command prompt and navigate to C:\Program Files (x86)\Microsoft SDKs\Windows\v6.0A\bin
- To generate a key pair run, SN.EXE -k C:\temp\snKey.snk
- Start Service Manager Authoring Tool
- From the File menu choose New
- New Management Pack, save the new management pack in a suitable folder, for example C:\TEMP\Contoso.WinCompExt
- Use the Class Browser to find the Windows Computer class, right-click it and select View
- In the Management Pack Explorer pane, note all the default properties. Right-click on the Windows Computer class and select Extend Class
- Target Management Pack, select Contoso.WinCompExt to save the extension in the management pack
- Click Create Property and add the following properties. Edit each property in the Details pane
Internal Name Name Data Type Note ContosoOrderDate Order Date Date Time ContosoCostCenter Cost Center String ContosoOwner Owner String ContosoExpireDate Expire Date Date Time ContosoApprover Approver String ContosoCost Cost Integer - Save your management pack
- In the Management Pack Explorer pane, right-click Contoso.WinCompExt and select Seal Management Pack
- Seal Management Pack,
Output Directory: C:\TEMP
Key File:Â C:\temp\snKey.snk
Company: Contoso
Click Seal and then Close - Start Service Manager Console and import the sealed Contoso.WinCompExt management pack from C:\temp\Contoso.WinCompExt.mp (make sure to select the .MP management pack, MP=Sealed XML=Unsealed)
- Close the Service Manager Console and open it again, this will re-load class information
- Navigate to Configuration Items/Computers/All Windows Computers and open a computer. Note all the new properties that are shown on the Extensions tab. We have now extended the Windows Computer class with the properties we need for the computer lifecycle demo.


The pricelist
One of the properties we extended the Windows Computer class with is Cost. My idea is to use this field to show the monthly price of the configuration item, the computer. We could input that price manual but we can also build a price list inside of Service Manager. To do that we can use the Authoring Tool to create a new CI class, Contoso Price List.
- Start Service Manager Authoring Tool
- From the File menu create a new management pack, for example C:\TEMP\ContosoCost
- In the Management Pack Explorer pane, right-click Classes and select Create Configuration Item Class
- Create Class, input ContosoCostItem as internal class name
- In the Details pane change the Name to Cost Item
- Delete default Property_4
- Add two properties, AvailabilityLevel and Cost. Change AvailabilityLevel name to Availability Level. Change data type to Integer for the Cost property. Change Key to TRUE on the Availability Level property
- Save the managemente pack
- Seal the management pack the same way we did with the first management pack
- Import the management pack into Service Manager. Remember to import the sealed version, MP file.
- Restart the Service Manager Console
- Navigate to Configuration Items
- Create a new folder, name it Price List. Create a new management pack, for example Contoso, and store the folder in it
- Select the Price List folder and click Create View in the Tasks pane
- Create View
Name: All Items
Criteria: All objects of the ContosoCost Item class, where object status does not equals Pending Delete
Display: Availability Level and Cost - Select the new All Items view and click Create Contoso Cost Item from the Tasks pane
DisplayName: Gold
Availability Level: Gold
Cost: 100 - Click Create Contoso Cost Item from the Tasks pane
Contoso Cost Item Properties
DisplayName: Silver
Availability Level: Silver
Cost: 70 - Click Create Contoso Cost Item from the Tasks pane
Contoso Cost Item Properties
DisplayName: Bronze
Availability Level: Bronze
Cost: 40 - Click OK

Runbooks
This example use a number of runbooks, all included in the export file attached to this blogpost. I will explain each one of them and you can import them and look at the in the Orchestrator Runbook Designer

- Â 700.10 Cost. This runbook will get the correct price for the new computer based on the price list in Service Manager
- 700.11 Count Machines. This runbook counts existing machines to figure out a suitable computer name for the new machine
- 700.2 Update Approver. This runbook updates the approver step in the service request template based on the cost center. The runbook attach approver to the manual approval step
- 700.3 Create VM (picture) creates the new computer
- 700.4 Update Service Request, updated the Description attribute on the Service Request. This is used when the machine is create to communicate the new computer name to the user. The user will see this in the self-service portal
- 700.5 This one will find all VMs that are close to expire date (2 months or less) and send a e-mail to the owner of the machine. Also flag the virtual machine that e-mail has been sent
- 700.6 Get Cost Center. This runbook gets approver for each cost center. This could be done with a external database or any other way
- 700.7 When a VM have passed expire date it is shut down in Virtual Machine Manager
- 700.8 Deleted expired VM, when the VM has been shutdown for 2 months it is deleted
- 700.9 Update expire date, if the user order a new expire date for the computer in the portal, this runbook will update the virtual machine with the new expire date
- 500.1-500.3, these runbooks are used to generate the HTML based report. One master runbook and then one runbook for each cost center
Report
Reporting have changed a lot with Service Manager 2012. We now have cubes to analyze the data and we use Excel to easy drag and drop fields to build table. The first image below show a table with everything that cost center 2 is running right now. If you want to sum everything into a one cell, total cost, it is a bit more difficult now when we are running cubes. We need to extend the cube to include that field. If you don’t know how to do that you could solve it with SQL reports or using Orchestrator. In the second image below you can see a HTML based report generated by a couple of runbooks in Orchestrator.


Runbooks, SC12day_demo_wolf
Management packs SC12 day MPs
Please note that this is provided “as is†with no warranties at all.
Monitoring and Operating a Private Cloud with System Center 2012
During Microsoft Management Summit (MMS) earlier this year I did the beta version of 70-246 Monitoring and Operating a Private Cloud with System Center 2012. The exam was quite deep and included a number of the System Center 2012 components. I was a bit surprised about the exam, it was really covering a number of the System Center 2012 components and I think it would be difficult to pass without some real world hands-on experience. The exam measure the following areas
- Configure Data Center Process Automation
- Deploy Resource Monitoring
- Monitoring Resources
- Configure and Maintain Service Management
- Manage Configuration and Protection
More info about the exam here.
I recommend everyone working with System Center 2012 and private cloud to take the training and do the exam. Microsoft Certification helps you stand out, you demonstrate your expertise to customers and employers, special these really deep certifications.

Who Did That? Auditing in Orchestrator
In this post I want to share with you some ideas around auditing in Orchestrator. When Orchestrator gets more and more integrated into your IT environment auditing and change control within Orchestrator also gets more important. In Orchestrator you have a couple of different ways to do this. You have the possible to enable audit trail. Audit trail is a number of text log files that contacts information about activities in runbooks and who started which runbook. Depending on how your runbooks are working the audit trail log files can grows very large and consumes a large amount of disk space. If you enable audit trail you should also plan how to archive and purge these log files. To enable or disable audit trail follow these steps
- On the Orchestrator management server open a command prompt and change folder to the Management Server folder in the Orchestrator installation folder , default C:\Program Files (x86)\Microsoft System Center 2012\Orchestrator\Management Server
- Run “ATLC.EXE /enable” to enable audit trail or run “ATLC.EXE /disable” to disable audit trail


In the Orchestrator Runbook Designer you can also see some auditing information. In the console there is an Audit History tab for each runbook. In the Audit History tab you can see all changes to a runbook, for example who change the name of an activity. Below there is figure that show an example of Audit History information. The information shown in the Audit History tab is a mix of data from two tables in the Orchestrator database, the OBJECT_AUDIT table and the CHECK_IN_HISTORY table.

To review all changes to objects in the Orchestrator database, for example a new setting on a activity run the following SQL query against your Orchestrator database. Note that the SQL query only show objects that have DELETED equals “0”, the SQL query only show objects that are non-deleted. You can change this setting if you want to see changes also to objects that are deleted.
SELECT P.Name AS [Runbook Name], O.Name AS [Activity Name], OT.Name AS [Activity Type], OA.Action,
CASE WHEN OA.Attribute LIKE '%[0-F][0-F][0-F][0-F][0-F][0-F][0-F][0-F]-[0-F][0-F][0-F][0-F]-
[0-F][0-F][0-F][0-F]-[0-F][0-F][0-F][0-F]-[0-F][0-F][0-F][0-F][0-F][0-F][0-F][0-F][0-F][0-F]
[0-F][0-F]%'
 THEN 'NEW ACTIVITY' ELSE OA.Attribute END AS Attribute, OA.OldValue, OA.NewValue, CIH.DateTime AS
 [Change Timestamp], S.Account AS [User]
FROM OBJECT_AUDIT AS OA INNER JOIN
 OBJECTS AS O ON OA.ObjectID = O.UniqueID INNER JOIN
 POLICIES AS P ON O.ParentID = P.UniqueID INNER JOIN
 OBJECTTYPES AS OT ON OA.ObjectType = OT.UniqueID INNER JOIN
 CHECK_IN_HISTORY AS CIH ON CIH.UniqueID = OA.TransactionID INNER JOIN
 SIDS AS S ON CIH.CheckInUser = S.SID
WHERE (O.Deleted = 0)
ORDER BY [Change Timestamp] DESC

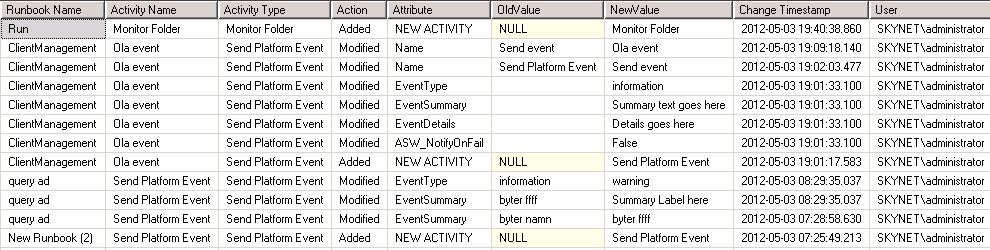
Thanks to Fanjoy and Ahrens for SQL query support.
List all activities not using default service account
A runbook is executed with the Orchestrator Runbook Service service account. In most scenarios that are not an issue. But in some scenarios you need a runbook to run with a specific account, and all other runbooks run with the default service account. This can be done with an extra Runbook Server that uses another Runbook Service service account, or per activity or it can be solved at design level in the runbook by using the Invoke Runbook activity. To configure a runbook to run with a specific account, please see this post.
Specifying an account on each activity requires a lot of administration. If you need to specify the same account on multiple activities it is recommended to use variables. Variables minimize the risk of incorrect input and also make updates much easier. In Orchestrator 2012 you can configure a variable to be encrypted. If you store a password in a variable it will not be shown or stored in clear text, instead it will be encrypted.
If you want to see all activities in your Orchestrator environment that is not using the default service account you can run the following query
SELECT OBJECTS.Name AS Activity, OBJECTS.ASC_Username, POLICIES.Name AS Runbook, OBJECTTYPES.Name AS [Activity Type]
FROM OBJECTS INNER JOIN
POLICIES ON OBJECTS.ParentID = POLICIES.UniqueID INNER JOIN
OBJECTTYPES ON OBJECTS.ObjectType = OBJECTTYPES.UniqueID
WHERE (OBJECTS.Deleted = ‘0’) AND (OBJECTS.ASC_UseServiceSecurity = 0)

Recent Comments